Studio 1

Studio 1, Project 3 - Post Mortem

This is a post mortem for a project I worked on in a team, called The Gold Standard. Overall, the project went well. Our initial idea of the game and how it played out is fairly representative of the final product. Although, there were a few problems that occurred during the production.

Laying out the Levels

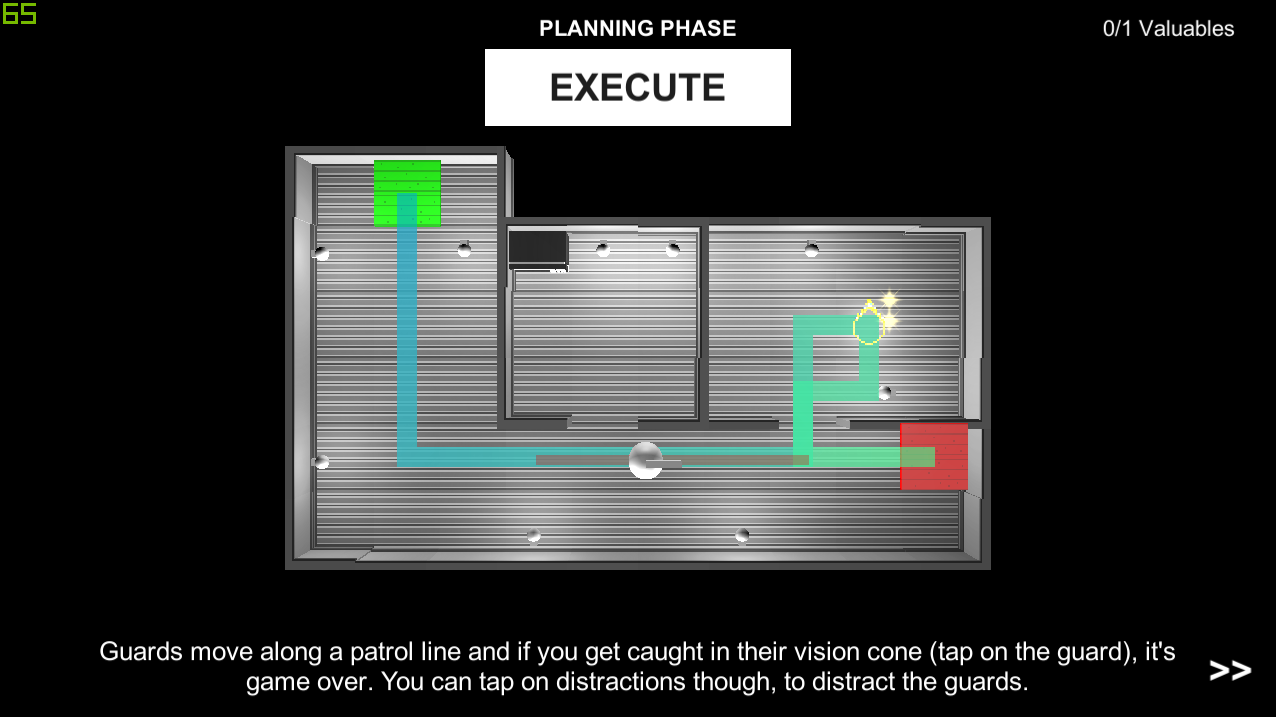
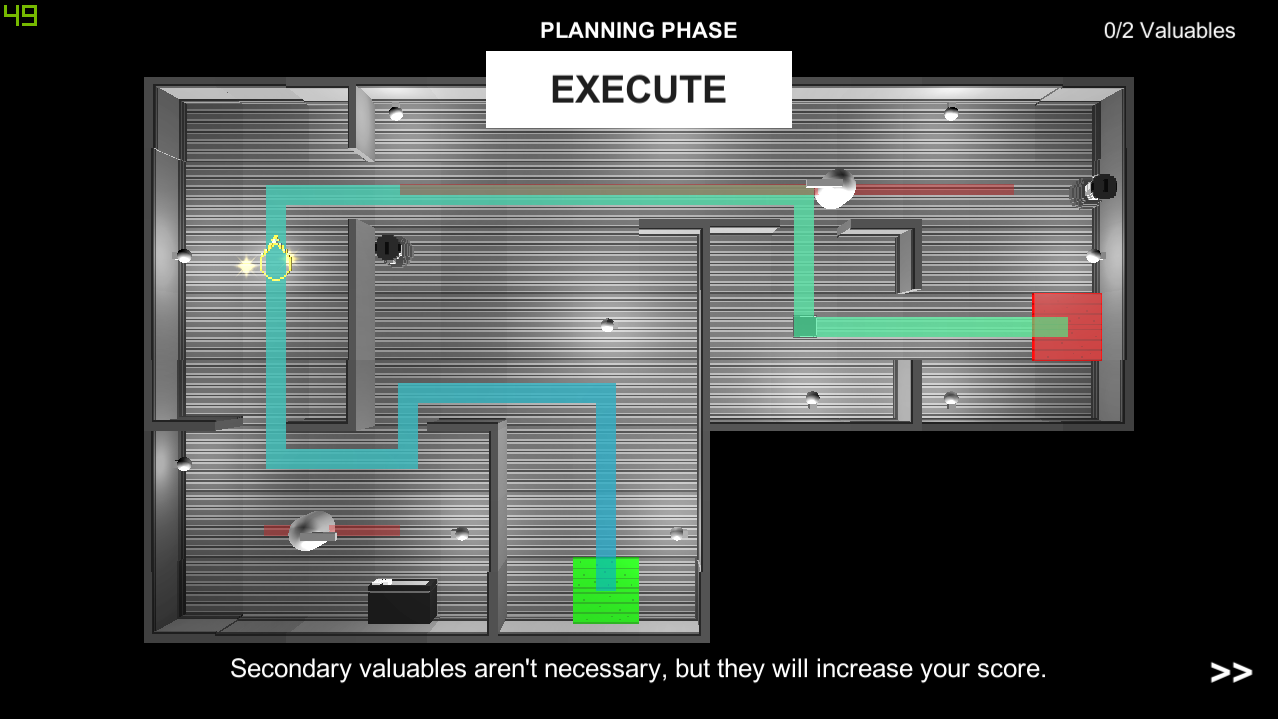
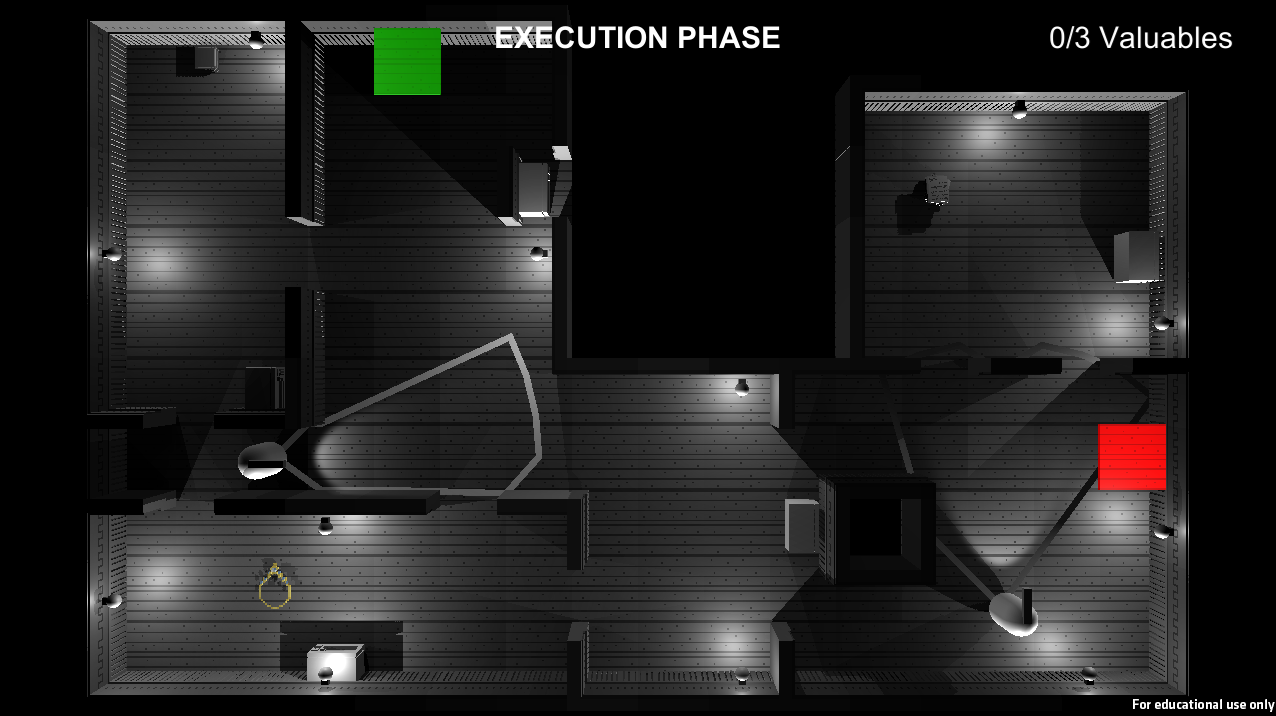
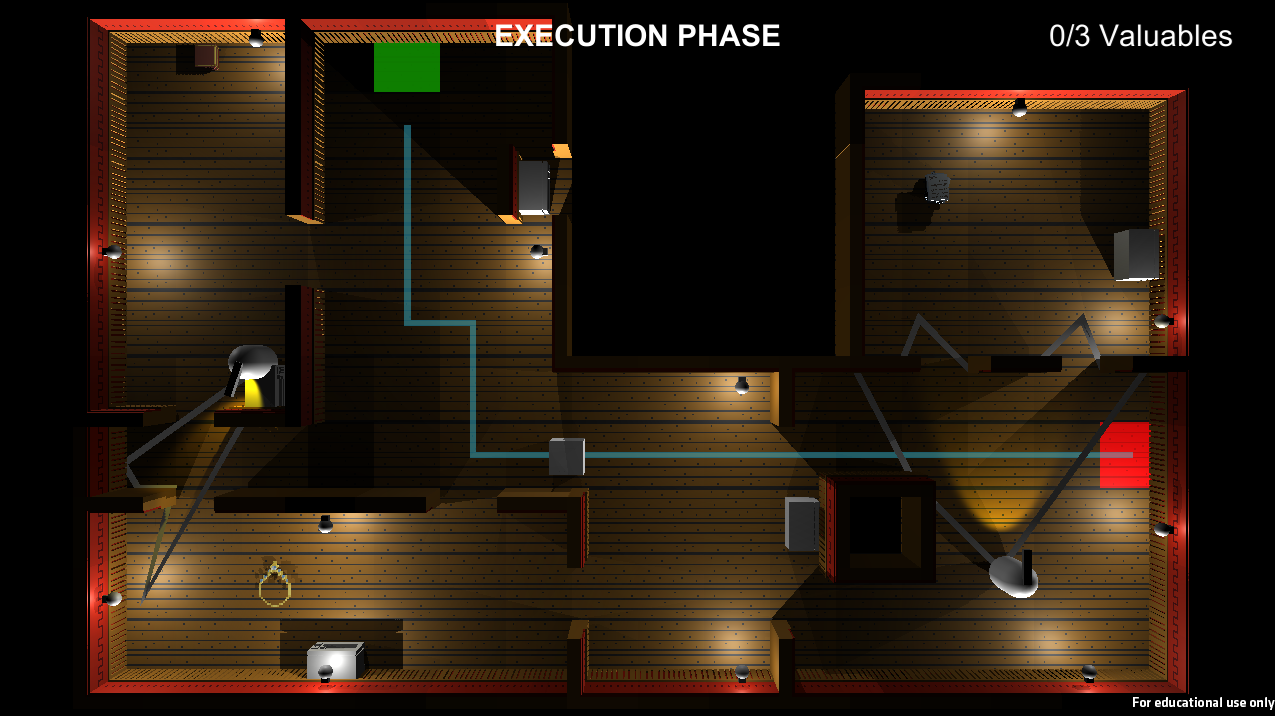
One of the problems I believe we had which occurred late in the production, was sitting down and documenting the layout of the levels. Us 3 games students each made many levels to reach the goal of 50. Our game was divided up into 5 stages, with each stage having 10 levels. I was given the first stage which introduced the mechanics of the game, while the other 2 team members had the other stages. This process of creating the levels happened during the last week of the project, due to systems of the game needing to be fixed beforehand. This rush of making levels caused them to be different in overall design and not really that well tested. We wanted to go for that strategic, edge of your seat experience for the player. Providing multiple possible routes, each having their own risk vs reward situation. In the end, the levels seemed bland. Each member of the team had their own way of which they laid out the levels and communication between each of us during this process was limited. We never had a document that we could refer to how the levels should play out. How many possible routes should there be? How linear or continuous should the levels be? We went out on a whim, producing levels that just looked kind of different from the previous one.

So how could this have all been avoided? Well the first thing I can think of, is a document. A level construction document was something that we started, but it just laid out which mechanics would be introduced when, not really that big of a help. The document would need to lay out: the flow of the level. How far into each level should the player come across a guard? Is it fair to have a guard see them in their starting position? In what way do rooms connect to each other? All these questions and even values should be discussed. Other things such as level time. How long should a level last? Min, max times? What is the maximum amount of time a player should be "inactive" from tapping on distractions? Most importantly, the document needs to tell the designers how they can make each level meet the desired experience that the game is trying to achieve. Communication is also something that needs to be involved. Talking between team members before, during and after a level's creation. Gaining feedback and making sure that the level meets the requirements for it to be a level. Playing each other's levels is also something that we didn't do, which we should have. In doing this, you can see how your 2 styles differ, and how you can make changes to closely seal the gap.

Source Tree Problems

We used Source Tree for the entirety of the project. It was working fine up until around half way through the project. A push or pull error led to one thing, then another, causing quite a bit of frustration and confusion for the team. The project ended up being accidentally deleted. To fix this, a new branch was made and after a bit, the project was back online, yet Source Tree was butchered in a way. Whenever we wanted to push or pull the project, we had to make sure that the correct branch was selected after making this local branch thing... it was pretty confusing. This took us a a bit of time to adjust to, yet there was something that we forgot totally. At the time the animators were pretty much done with their assets, except for a few small things. It wasn't until close to the end, when we realised that those few animators who were pushing changes, didn't push to the new branch. This was totally on us and we should have told them instantly. Luckily it didn't cause too many problems as the changes were very minor. This happened because as early game developers all we really need to know about Source Tree is pulling and pushing. We don't need to know the ins and outs of the program, so when a critical error occurs or something bad is about to happen, we're kind of in the dark. It also occurred because we never really had a schedule or talk about who will be working on what assets at what time. When multiple people are working on the same thing and they try to push or pull changes, it can cause problems. Many of these minor problems did occur almost on a weekly basis.

Getting around this problem would be done by management. Knowing who is doing what at what time. Having only one person working on one asset at one time allows for a clean push and pull to Source Tree. In the future when working in a team environment on Source Tree, we're going to be more clear about what we're working on. HacknPlan would be useful in this case. Making a task called "Working on ..." or "Implementing/improving ..." makes it clear what you're doing. Telling team members to also constrict what they change while working is great too. Going around messing with different prefabs and scripts when you don't know if you should is not a great thing to do. Making sure everyone just sticks to their task and test scene will hopefully prevent the issues that occurred with our Source Tree project.

Getting the Work Done

One thing that I believe went very well for our team, was getting the work we needed complete. Whenever there was a deadline for a certain amount of work to be done, both documentation and the actual game... most of the time it was good to go. We tested our game at every playtest, getting useful feedback to improve it upon. One of the big reasons I believe this happened, was due to laying out the tasks early on. At the start of every week and/or milestone, we laid out the tasks we needed to do for that week. This gave us an overall goal. Throughout the week then, seeing this large list of tasks encouraged us to work at it, rather than entering the tasks as we went. If that was the case, then I believe most of the work would have been done on Sunday night. Team meeting were also another big help. Every Tuesday and sometime during the rest of the week we tried to have a team meeting on Discord. In them, we would discuss what needed to be done for the week, who was to do it and to what standard we expected the work to be at by the end of the milestone. 

In the future, continuing on with this layout is certainly going to be good. Setting up the tasks day one of the first milestone sets that large objective ahead of the team. Seeing all the work that needs to be done, discourages trying to cram is all in a day before it's due. Team meetings are also obviously a good thing. Even though we had around 2 a week, I believe that we should have had more. In my mind team meetings create that "boost" of work. After one, you're encouraged to continue working on what you're doing , before that slowly drops down. Having a team meeting 3 times a week, one Tuesday, one Friday and one Sunday would evenly spread out that work flow. 

Dev Diary - Project 3: Creating a Useful Art Bible

As project 3 is coming to a close, we can look back on our documentation to see what worked and what didn't. Since we had 6 animators working with us this time around, creating an art bible which conveyed the visual style of the game and all the assets was vital. Looking back at ours, I can see what went to plan and what didn't.

In my mind, what's necessary for an art bible is...

  • Understanding your platform.

Knowing what device/s you're making the game for can help you in deciding on a style. For us it was voxels, so deciding between small, detailed voxels, and large ones depended on our platform. Since we were publishing mainly for mobile, we later decided on making the voxels larger so that there is less screen static. Unfortunately this was later on in the project and we didn't get around to actually implementing this new style into the game.

  • Conveying a visual style.

Many games have their own distinct visual style. For ours, we went with a saturated, red/brown/green look. In the art bible, referencing other games, movies, paintings and more is great for conveying that visual style to your art team. Explaining what you want out of each image and what you don't, can create a solid ground work for the final product.

  • A good colour palette.

In the same lines as the visual style, a colour palette can make a game what it is. You need to visually show the style of colours you want in the game. How saturated? Bright? Colourful? Having a colour palette followed by an example image of anything is also a great help. You want your art team to be creating the same looking assets that follow the colour palette and visual style closely.

  • Animation style.

Still following with the art style, animation style is quite important. It can determine quite a lot about your game. Do you have bouncy, big animations? Then you're probably conveying a fun or action game. Do you have tight, direct animations? Then this could be a serious strategy game. We didn't take animations into account until later on, yet doing so earlier will make the game you're working on more streamlined to a certain experience.


Dev Diary - Project 3: Music Creation

Our game is a stealthy, strategy game. So for this, appropriate music is necessary. Something similar to James Bond or Mission Impossible but not as loud and impactful. This is a game where you are trying not to be seen, yet are constantly on edge as a guard can spot you at any time.

111.PNG

For the music creation, I used Bosca Ceoil. An itch.io tool which is very easy to use. The image above is of the overall arrangement of tracks. Each track is around 3 seconds long and you can choose an instrument and notes to play. These combined creates your song.

giff33333.gif

I used a drumkit, "magical" bass and a special digital synth or something. Many of the instruments are quite abstract and sound quite similar. 

For the tempo, it's quite quick yet slow at the same time. It creates that sense of suspense for the player, with the osculating beats. 

My only problem with the song is that it's quite repetative. If you're playing the game for a long period of time, then hearing the same 4 tracks over and over again might drill into your brain. This is due to me not spending a lot of time working on it, as well as the program's simplistic nature.

Anyway, here's the final song. It will be used for background music in the levels, hopefully creating the experience we're going for.

Implementation into Unity

The way we have our project set up, the menu and actual game are separate scenes. This means that the song can just be applied to an AudioSource in the game scene. So when you click on a level in the menu, it loads the game scene and the song is playing automatically.

In the GameManager game object, an AudioSource component was added. The music track was added as the audio clip and "loop" was enabled so that it keeps repeating as long as the level is open.

Dev Diary - Project 3: Sound Effect Creation

For our game we have a variety of different interactables. TV's, washing machines, radios, etc. For all of those things, we need sound effects. Although not a necessity to the game, it does add polish and player feedback.

1.PNG

One of the sound effects that I made, was for the radio. We want short snippets that can be played upon tapping an interactable, so around 2 seconds is good.

For this effect I used 2 different clips. The first one, is turning on a radio with a bit of chatter, and the second one is white noise/static.

Like in movies when you hear people turn on a radio, sometimes there is that static noise before the music. This replicates it.

When I imported the clips though, the static was too loud and the chatter was too quiet. To fix that, I simply made the chatter louder and the static quieter. At the start of the chatter clip, there is a click noise which sounded good, so that was dragged forward and amplified so that it can be heard better. Also many parts of the chatter clip were cut or shortened so that the final clip included both the quick channel flick and foreign talking. This in turn, created a radio distraction sound effect.

Here it is, if you want to give it a listen.

Dev Diary - Research Report: 2D Sprite Outline Shaders

1.png

Outline shaders, especially for 2D is something that i'm very interested in. These can highlight objects that the player needs to interact with or follow. So I decided to jump in and learn how to make them. 


First, we need some properties to know: what the sprite we will be outlining, if we'll be outlining it and what colour it'll be.

 
[PerRendererData] _MainTex ("Sprite Texture", 2D) = "white" {}
[PerRendererData] _Outline ("Outline", Float) = 0
[PerRendererData] _OutlineColor ("Outline Color", Color) = (1,1,1,1)

Also adding in our pass definitions, telling the pass what to do and what not to do. We don't want depth, lighting, or anything that can alter the outline in the game space.

Then we need fill out our tags which will tell our shader how it will work and render the final image.

Tags
{
    "Queue" = "Transparent"
    "IgnoreProjector" = "True"
    "RenderType" = "Transparent"
    "PreviewType" = "Plane"
    "CanUseSpriteAtlas" = "True"
}
Cull Off
Lighting Off
ZWrite Off
Blend One OneMinusSrcAlpha

In our pass CG PROGRAM, we want to indicate our comnpilation directives. 

#pragma vertex vert
#pragma fragment frag
#pragma shader_feature ETC1_EXTERNAL_ALPHA
#include "UnityCG.cginc"

Then we are going to pass in our vertex data and run it on each of the verticies of the sprite. Since we're making an outline for a 2D sprite, this isn't going to be too flash.

struct v2f
{
    float4 vertex : SV_POSITION;
    float4 color : COLOR;
    float2 texcoord : TEXCORD0;
};

float _Outline;
fixed4 _OutlineColor;

v2f vert (appdata_base IN)
{
    v2f OUT;
    OUT.vertex = UnityObjectToClipPos(IN.vertex);
    OUT.texcoord = IN.texcoord;

    return OUT;
}

Now this is where we begin to create the outline. In the fragment shader, we basically first get the pixel's colour from the "SampleSpriteTexture" function. This is a custom function which returns the colour of the sent pixel coordinate. 

Then we check if we're supposed to draw an outline and if the pixel is not transparent. If so, then we get the colour of the adjacent up, down, left and right pixels of the current one. If any of those pixels are transparent, then we make this pixel the outline colour.

fixed4 frag (v2f IN) : SV_Target
{
    fixed4 c = SampleSpriteTexture(IN.texcoord) * IN.color;

    if(_Outline > 0 && c.a != 0)
    {
        fixed4 pixelUp = tex2D(_MainTex, IN.texcoord + fixed2(0, _MainTex_TexelSize.y));
        fixed4 pixelDown = tex2D(_MainTex, IN.texcoord - fixed2(0, _MainTex_TexelSize.y));
        fixed4 pixelLeft = tex2D(_MainTex, IN.texcoord - fixed2(_MainTex_TexelSize.x, 0));
        fixed4 pixelRight = tex2D(_MainTex, IN.texcoord + fixed2(_MainTex_TexelSize.x, 0));

        if(pixelUp.a * pixelDown.a * pixelLeft.a * pixelRight.a == 0)
        {
            c.rgba = fixed4(1, 1, 1, 1) * _OutlineColor;
        }
    }

    c.rgb *= c.a;

    return c;
}

So pretty much, if the pixel is at the edge of the sprite or surrounded by a transparent pixel, colour the pixel the outline colour. This is an inside outline compared to a shader that draws the outline outside of the sprite. Which one is better? It depends on what you're making and how much pixel real estate you wish to give up. For pixel art games, this one probably isn't the best, yet for games with larger sprites the issue won't matter that much.

Now, having this shader as it is wont do anything. So we need to add it into Unity...

Implementing it into Unity

First, we need to make a new Material and set the shader to "Sprites/Outline". This material can then be applied to sprite renderers. Yet... it doesn't do anything.

To fix this, we need to make a script. This script can be called SpriteOutline and it will transfer values that we enter such as colour and outline size to the material.

[ExecuteInEditMode]
public class SpriteOutline : MonoBehaviour 
{
    public Color colour = Color.white;
    private SpriteRenderer sr;

    void OnEnable ()
    {
        sr = GetComponent<SpriteRenderer>();
        UpdateOutline(true);
    }

    void OnDisable ()
    {
        UpdateOutline(false);
    }

    void Update ()
    {
        UpdateOutline(true);
    }

    void UpdateOutline (bool outline)
    {
        MaterialPropertyBlock mpb = new MaterialPropertyBlock();

        sr.GetPropertyBlock(mpb);
        mpb.SetFloat("_Outline", outline ? 1.0f : 0);
        mpb.SetColor("_OutlineColor", colour);
        sr.SetPropertyBlock(mpb);
    }
}

Make sure that at the top of the script the [ExecuteInEditMode] tag is added. This makes it so that the shader can be visible while not in play mode.

For our variables, we have the colour that the outline will be and the sprite renderer, of the sprite we're affecting. 

The enable and disable functions get the sprite renderer component, as well as updating or not updating the outline.

In the UpdateOutline function, we transfer those valuables to the outline material. The "outline" float is either 1 or 0 and determines whether or not the outline is on or off. Then we just need to apply the script to the object with the outline material and...

It's complete. We can alter the colour of the outline in the editor.

Using it in the future

Now that the outline shader is done (and works), it's ready to be implemented. At the moment though, I don't have any games that would use this shader, but hopefully in the future that will be a possibility. 

Things like highlighting items, making enemies visible through walls, etc, will all be possible by this shader. It may need tweaking to allow for seeing it through walls and outlining away from the sprite (not inside it), but that's for the future. This was just a learning experience in seeing how these sort of things are made, how difficult it is and how well it works.

References

Dev Diary - Research Report: Grid Pathfinding

Something that i'm very interested in is pathfinding. More specifically grid pathfinding. So I decided to go and learn what it is, how it's done and how I can implement it into a project.

There are 2 main different types of pathfinding. A* and Dijkstra. A* checks all the surrounding tiles of a starting point and sees which one is generally the closest to the end tile. Then that tile is checked and so on. With Dijkstra, each tile around the start point is checked to see if that tile is the end tile. If not, those surrounding tiles of that tile are checked. Below, A* can be obviously be seen to be the better of the 2. It's more efficient, and that's what i'm going to be going into with this research report.

 
1.PNG

We start with our start tile and end tile. What we want is the shortest path between the 2 tiles.

Then we check each of the start tile's surrounding tiles.

The top-left number is the G cost. This is the distance from the starting tile.

The top-right number is the H cost. This is the distance to the end tile.

Added together, these numbers form the F cost of that that tile. The F cost will be used to determine which tile's should be included, and which ones shouldn't.

3.PNG

By looking at the F cost of each of the surrounding tiles, we can see that the top-left tile has the lowest cost. So then that tile gets selected and the surrounding tile's values are calculated.

In this case where multiple surrounding tiles have the same F cost, we can just go with the tile that has the lowest H cost. 

Here, the new tile we selected has surrounding tiles that are not the lowest on the board. From the original starting tile, we can see that the top and left tiles have the lowest F cost. They also have the same H cost too, so we can just select both of them.

In doing this, we are creating an array of tiles which could hold the possible shortest path. We just need to keep on going with these calculations, until we reach the end tile.

After some time we finally reach the end tile and out of all the red tiles, the shortest path can be found.

So how can this be used in the future?

This grid pathfinding is very useful. In the future there are games that I will probably make, which will require a system like this. Strategy games, puzzle games and even other types of games that don't use grids, which this system can be translated to. Unity already has many assets and scripts online for grid pathfinding, yet knowing how to do it yourself is always good.

Games like Civ 5 and other 4x games use grid based pathfinding to move units. These sort of games are very complex, yet at their roots use this sort of pathfinding system.

Games in the future that i'll want to hopefully make are 2D strategy games. Things similar to Civ (yet less complex) and realtime war games which use individual units. These sort of games can be as complex as you want them to be, still with a level of strategy required.

Dev Diary - Project 3: Collaborating

This project was the first video game where we were assigned team members from other disciplines. We had six animators on our team, who helped out in creating the 3D voxel assets for the game. Later on in the project, we were contacted by audio students who helped out by creating music and sound effects for the game.

Working with the animation students...

Working with the animators was pretty good. Since we had them in our team from the very start, they were in our Discord and attended some of our meetings. We had an asset list of all the things we needed made and generally, they were on time. The models they made were of high quality and matched the requested colour palette. 

Their involvement in the project didn't end there. An animators workflow document was written up for them to follow, which explained how to set up SourceTree and how to import the models into Unity. This probably got them more comfortable with both software's and made the process of importing the models easier for us. With all the pushing and pulling from SourceTree, the animators didn't really mess up once. There were no un-merged, or disconnected branches from their side, which for us is great.

Working with the audio students...

Working with the audio students was similar to the animators. We had three audio people come in at around the end of the project, as it was great timing because we didn't really have much to do with sounds in the game.

They just asked what sort of theme we were going for with the music. Then we talked a bit about the sound effects we needed for the appliances. It was generally a quick conversation and they went on their way to produce them. With the audio people though, we didn't get them to do the whole SourceTree then Unity process as this was very last minute. If they were in the project from the beginning though, that would be the case and just like the animators, they would probably not dissapoint. 

Dev Diary - Project 3: Teaching the Player

The first stage of the game is there to teach the player how to play the game. Each level at the start presents a new mechanic/system to the player.

Level 1

t1.PNG

Level 1 introduces drawing the accomplice's route and collecting the primary valuable. Why wasn't the first level just drawing the route? Well because the goal of every single level is to collect that valuable. Having the first level dedicated to just that objective with no other distractions in the way, implies that this is what the player needs to do. Having the primary valuable in a separate room also shows that the path can turn. If the valuable was in the middle between the entrance and exit, then that ability may not be known to the player.

Level 2

t2.PNG

Level 2, we introduce guards, in turn also distractions as well. This level shows the player how guards interact with distractions and how they move along patrol routes. The guard is mostly always in range of the distraction, so when it's touched, the guard will mostly always go to it. Since it's in a separate room, it makes this level quite easy.

Level 3

Level 3 had multiple distractions. It shows that solutions to a level aren't visible in the first few seconds. The player will need to think when and which distractions to tap, so that the guard doesn't see their accomplice.

Level 4

t5.PNG

Level 4 introduces secondary valuables. With previous elements and systems that were introduced, in play, this secondary valuable is something that is quite easy to get and the path to it is easier than if you were to avoid it. This is just to show the player what a secondary valuable is, and how it can improve your score. In the future, these valuables won't be as easy to achieve and will most of the time be along the path with most risk.

Dev Diary - Project 3: The Third Playtest

For the playtest this Monday, we were tasked to get all 50 levels completed. We got around 40 of them done, which was enough for testing. For this playtest, we wanted to know if the level progression was good and if the structure of levels, creates the experience that we're going for. 

Questions we asked were:

  • Do you feel as if there was a steady increase in difficulty as the levels went on? (yes/no)

We wanted the levels to feel as if they were getting harder. The first stage is there to teach the player how to play the game, and the next 4 will increase in difficulty.

  • How often did levels present multiple paths with different levels of challenge? (never-always)

This is a strategy game, so presenting the player will multiple ways to complete a level, each with a different level of risk vs reward is something that we're trying to achieve. Having just one obvious path would make the strategy aspect of the game obsolete.

  • Do you feel that passing a guard was based more on the following... (skill/timing/chance)

Tension and stealth is the other part of the game that we want the player to experience. Having close calls with the guards vision cone creates that sense of excitement.

  • What elements of the levels did you observe in the Planning Phase? (distraction radius'/guard vision cones/secondary valuables)

The Planning Phase is still something we need to work on. It is the moment where players can sit back and observe. Know the ins and outs of the level, where the guards move, to what extend their vision cones touch certain objects, etc.


So how did it go?


For this playtest, we unfortunately only had 2 testers, yet their results are still interesting.

  • Do you feel as if there was a steady increase in difficulty as the levels went on? (yes/no)

50% yes, 50% no.

This is probably due to the way we made the levels. Each person on the team was assigned a stage (10 levels) to complete. Since we were doing these in our own time, not generally sharing difficulty curves with each other, the increase in difficulty probably stopped at the end of stage 1 and fluctuated from there. There was never a talk about how each stage will increase in difficulty, or how to create that increase. More guards? Larger levels? More complex guard patrols or less distractions? More distractions? These things were never quantified, never looked at and tested in the terms of difficulty.

Do we have time to do this? Probably not. It is something that we should have done quite a bit earlier on.

  • How often did levels present multiple paths with different levels of challenge? (never-always)

Both testers were halfway between never and always.

A bit like the previous question, we never quantified how difficult something is from something else. Creating these multiple paths with varying difficulty is something that I done a bit with my levels. We talked about it a bit as a team, but with the close deadline, that was probably an afterthought. 

  • Do you feel that passing a guard was based more on the following... (skill/timing/chance)

50% skill, 50% timing.

With the visible guard patrols and execute button added in from the previous playtest, timing where guards will move and when is something that is easier to do now. I don't think it's 100% not chance though, as there are still bugs with the guard vision cones, but there is an improvement.

  • What elements of the levels did you observe in the Planning Phase? (distraction radius'/guard vision cones/secondary valuables)

50% for distraction radius', 50% for guard vision cones and 0% for secondary valuables.

Last playtest, we changed up the Planning Phase quite a bit. An execute button was added, better accomplice route, glowing primary valuable, guard paths, etc. Still though, some of these elements are not the best. We found out in the playtest, that holding down on the guard to see their vision cone was awkward. Your finger covered up the guard and sometimes even the vision cone. To solve this, we could add in a button on the side of the screen to make all guard vision cones visible.

For the secondary valuable not being seen, that is still a problem. We want those objects to have a shiny effect but not like the primary valuable. If we make it shiny, yet less visible, then there's the chance that it may not be seen. Yet at the same time you don't want it being more visible than the primary valuable. 


Some other changes made were...

On the day, we added in a "speed up" button. This button when held down, increased the time scale of the game to 2. Why? Well because in the earlier levels and some of the later ones where there is a large amount of open space, watching the accomplice move through it is a bit boring. The player doesn't really have a lot of stuff to do then, so having them hold down this button to increase the speed is good. It also creates moments where holding it down might make them run into a quickly turning guard, putting that risk vs reward sense into it somewhat.


questions for the future

From this point, there are still questions we'll need to ask for potential future playtests. Even though this test returned results, that does not finalise what we need to know.

The next playtest will most likely continue with asking questions about the level structure. Since they are our weakest part of the game at the moment, they will need much more iteration and improvements. This will require the team to coordinate and document what dictates a level's difficulty. 

Questions for the future may be:

  • How often did you have close encounters with the guards? (never-always)

This question will further give us insight on whether the intended experience is being met. The guards coming very close to the player, almost detecting them is what you want. It creates intense moments and excitement. 

  • When repeating levels, how often did you try out an alternative path, rather than just repeating the same one over again? (never-always)

The player taking alternate routes through the level is something that we want to happen. When one route fails that might mean that either: the route is bad or that you didn't tap on the distractions at the right time. We want to encourage this behaviour both to create variety and that risk vs reward feeling when going for secondary valuables.


Dev Diary - Project 3: The Second Playtest

By the second playtest on Wednesday, the game had many improvements. The accomplice route was fixed/improved upon and many of the smaller bugs to do with guards and UI were fixed. For this playtest, we wanted to know if the planning phase had enough information and clarity for the player to know how to accomplice the level. 

Some of the improvements we added in from the first playtest were: tapping on distractions cause a radius of effect to pop up, and the entry/exit tiles "pop", to get the player's attention.

After the testers finished the level/s, they went to answer the questionnaire. It asked such things as: What elements did you observe during the planning phase? Do you feel that the planning phase prepared you enough for the execution phase? How clustered was the planning phase?

Overall, around 2/3 of the testers agreed that the planning phase prepared them enough for the execution phase, with the screen not being that clustered. One of the main concerns was the testers did not really remember the guard patrols and sitting there in the planning phase watching, was quite boring. So we added in a faint red line for each guard, displaying their patrol route. This game the testers more clarity of where exactly each guard moved and even if they're in range of distractions.

The problem though, is that the screen started to become to clustered. We were still planning on adding in a particle effect for the primary valuable since that is what's needed to complete the level, yet with that done, the planning phase looked like a mess. Guard vision cones/patrol lines, entry/exit tiles, distractions and now the primary valuable made the screen hard to read. An idea was that the guard vision cones were only visible when the player was holding down on that guard.

This was perfect. Not only did it reduce the screen cluster in the planning phase, but it gave the player something else to do in the execution phase. They now have to control both: tapping on distractions and tapping on guards to look at vision cones.

At the end of the day, the planning phase of the game changed. The screen became less clustered, guard movement became more precise visible to the player, and the execution phase was given a new mechanic for the player to play with.


Dev Diary - Project 3: Changing The Game

During the playtest, the major issue was with the "Planning Phase". Our idea was that when the phase starts, the player can observe guard movements and draw out a route for the accomplice. When the player finishes the route on the exit tile and lifts their finger, the "Execution Phase" triggers instantly.

What we found in playtesting was that finishing the route and instantly switching phases, disorientates the player. The accomplice is already moving by the time they even begin to lift their finger away from the screen. This instant change is what we don't want. It creates the experience of not being in total control of the accomplice and its path, as you should be. 

A way to fix this, would be to make the "Planning Phase" truly a planning phase. When the player draws the route and it connects to the exit tile, it doesn't instantly start the next phase. A button pops up saying "EXECUTE". Pressing it will start the "Execution Phase". This gives the player time to still plan. They don't need to awkwardly hold their finger 1 tile away from the exit, waiting for the guards to get into position. Having a dedicated button to then start the next phase, allows the player to time the execution more precisely. As after all, it is a stealth/strategy game and giving the player time to observe the play-field is necessary. 

Also, during the playtest, drawing the actual route was a challenge in itself. If you let go before getting to the exit tile, the route would disappear. If you hit a wall, the route would disappear. The route also couldn't overlap itself. This was a massive problem and the main point of feedback from testers.

In having the route drawing like that, it takes away from the experience yet again. Drawing the route shouldn't be hard. It should be something you can do in the back of your mind while observing guard patrols and figuring out the best places to move to. Focusing on drawing the line, not hitting walls removes that aspect of observation. So a way to fix it, which is already underway is...

  • Allowing the player to let go of the path and continue on with it, allowing them to let go of the screen.
    • This will allow more time for the player to observe the level.
  • Overlapping the route.
    • This allows for more possible paths, more solutions to the puzzle.

Dev Diary - Project 3: The First Playtest

Today was our first playtest. We went into class with a few minor issues that we quickly tackled before the testing. These including making the game run much smoother on the tablet. Apart from that, the game was pretty solid for a weeks work.

We had numerous people playtest the game and even with a 1 page document telling them what to do, some of them were confused.

In the "Planning Phase" you're mean't to draw out your accomplice's route, going over the primary valuable and finishing at the exit. Can you tell how you would start? Where the entry/exit is? Where the primary valuable is? Visually showing the player what their goal is and how they can start, is something that is missing.

By far the biggest issue with the playtest though, was drawing out the accomplice's route. Around 80% of the time, the testers were trying to draw the line, hoping that it won't hit a wall and destroy. This was a big issue on our side. In our minds we expected around 30-40% of the playtime for each level would be in the "Planning Phase", not almost the whole playtest. 

t2.PNG

Once the testers finally made a route, the "Execution Phase" happened straight away. They were thrust into the game, with the accomplice moving along the path. What they had to do from that point was still unclear. They read that they need to tap on distractions to distract the guards, but where are they? What do they look like? By the time they managed to figure it out, they were already caught. Again like mentioned before, showing the player what they can interact with is necessary.

So what needs to be fixed?

  • First of all, drawing the accomplice route.
    • Make it not destroy when it hits a wall.
    • Fix all the numerous bugs it had.
    • Make it not instantly switch phases upon letting go on an exit tile.
  • Visually show the player what to do and how the world works.
    • This could mean having the entrance tile glow or flash to attract the attention of the player, showing them that that is where they need to start drawing their route from.
    • Make distractions and the primary valuables more visible.
      • Have the primary valuable glow golden.
      • Have the distractions show off a radius of effect during the "Planning Phase" and have a small particle effect.
  • Numerous small bugs to do with the guards, including...
    • Accomplice being able to walk through vision cone sometimes.
    • Movement bugging out.
    • Moving to distractions and standing at an awkward position.

Dev Diary - Project 3: Learning How to Use CSV's in Unity

For our project we will be making out levels in Google Sheets and exporting them as CSV's. I've been looking at examples of both CSV's and CSV readers on YouTube and different websites. Pretty much a CSV file is a spreadsheet converted to text, separated by commas. A CSV reader, converts that file into pretty much anything. It can be a simple sting array or even a dictionary. It depends on what sort of project you're working on, as well as how complex/flexible you want the reader to be. For our project, we're going to be reading prefab names from the CSV. So it will translate to either a normal string array, or a 2D string array, which will give us coordinates for placing the tiles. Let's look at an example of a CSV reader I found online here, and break it down.

1.PNG
 

This is a function essentially takes in a CSV file as a TextAsset and returns a 2D string array. A 2D string array would be best for grid based games, such as the one we're making. This is because the 2 index's that an element has in the array can correspond to a reference point in a grid, or as an individual tile.

2.PNG
 

Then we create a 2D string array variable called "allStringsByWord". This array will have each element corresponding to an individual word or "cell" in the CSV. Also there is another variable, this time just a normal string array called "allStringsByLine". This is then set to be each line of the CSV file. The .Split function, splits a string based on a character. In this case it was the "\n" or new line character, so each element of the array will be a line in the CSV.

3.PNG
 

Then we make the "allStringsByWord" array's row count equal to the amount of lines (or rows) in the "allStringsByLine" array.

4.PNG
 

Next, we loop through the length of the "allStringsByLine" array. Each row in the "allStringsByWord" 2D array, is having columns added. These columns are done by splitting the same corresponding element in the "allStringsByLine" array by commas (,). This essentially makes the 2D string array represent the spreadsheet layout. If there are 5 rows and 3 columns in the spreadsheet, then the array size will be [5][3]. You can then get elements from that array, for example allStringsByWord[2][1] will return the cell of string from the 2nd row, 1st column.

Our CSV loader will of course be more complex in the game. It will need to sort through each element of the 2D array, perhaps each element would also have more than 1 value. Since we have guard patrols, this may be a challenge. Either way, through looking at this CSV loader and many others, I now have a better understanding of what they are, what they do and how they do it.

Dev Diary - Project 3: Learning MagicaVoxel

For our 3rd project we will be using MagicaVoxel for the 3D models. We have 6 animators working with us, yet it's still good to know how to use the program. First I downloaded the program and then watched this YouTube tutorial. It was about making a tree yet I knew what I wanted to make.

I went in and re-created the car model from my Barnstorming remake.

2.png

I started off pretty much the same way I did with the original model. With the wheels. I made one, then duplicated it 3 times. This gave me the general dimensions of the car, placing the 4 wheels. From there, I made the 2 axles connect the front and back wheels, then have the drive shaft connect those 2. Then the base plate and the orange "wheel guard" thing. From this point I was already using quite a few tools. I used the circle tool to create the wheel shape, the paint tool to make the white hub caps and the "extend" tool to make the axles. 

3.PNG

The next step was for the body of the car. I tried to get a similar looking red and began to draw it on. For this part I turned on the mirror option, so that I really only needed to create half the car. Since I was working with voxels and could pretty much draw on the textures, I decided to add some detail. The shape of the door and edges of the car's body are painted on in a darker red. I think it makes the car look a bit better, yet some could say it makes it look tacky.

Other features I added to the car that diverted from the original was:

  • Spare wheel.
  • Dimension to the car body.
  • Bottom axles and driveshaft.
  • Interior.

I made an interior to the car. It had a dashboard, steering wheel, pedals and seats. For this I needed to really know the camera tools. They were pretty easy to understand and actually much better in my opinion than other 3D model programs. Here, you just hold right mouse button to look around and scroll wheel to zoom in and out. While other programs like Maya require you to hold ALT to look and move around, MagicaVoxel is simple yet effective in its camera controls.

Dev Diary - Project 3: The Second Pitch

After our initial pitch, we were told that by the end of the day, we would be pitching our games again, based on the feedback. Since me and my team pretty much remade our game, we had to create a new pitch. 

Since the new game has a more solid grounding and a definitive start and end point to each level, it was much easier to talk about. With the previous game, it was just "sneak around and steal stuff". This one has 2 distinct stages, each giving the player different playstyles and options.

We also had images showing what the game would look like on the tablet. With our previous pitch, we had questions asking about the camera angle and presentation of the levels. The audience weren't able to picture the game in their head which is a problem. Having images representing the game though, fixes this and allowed us to show off the 2 different stages, planning and execution.

Overall, the pitch went well. Much better than our first one. Some of the feedback we got was:

  • Consider the game play time.
  • Have the player steal more sentimental valuables, rather than money.
  • Consider the planning stage.

It's quite open. There was no feedback directly criticising parts of the game, but feedback that wants parts of the game to be flushed out more. I don't really know how to put it into words. The game idea was deemed good and overall, people liked it. The scope was good, and other questions were generally asking if certain mechanics would be in the game. From the feedback we also got quite a few new ideas, like having some items affect the accomplice and maybe having the guards get suspicious if the player triggers too many distractions.

From here, we need to finalise the game idea and start working on the feature spec and tech spec.

Dev Diary - Project 3: Creating a New Game in 30 Minutes

After the initial pitch and feedback, we as a team were thinking. You as the player are essentially just moving around. In a way it is a dungeon crawler. Along with the scope being too big was the fact that this game wasn't a unique touch experience. It would be better to play this type of game on a computer or with a controller. So we decided to create a new game.

An issue with the Thief like game, was that its mechanics were all over the place. There was no hook or interesting core idea of the game. You walked around. Avoiding guards while stealing valuables. I also thought that there was no structure. If you were to tell someone about this game and explain how the process of completing a level was achieved, you couldn't really. It would just be something like "sneak around and steal stuff". It just didn't sit right with us after the pitch feedback.

The new game we designed though, is much better in our opinions. You the player, are the eyes in the sky, the hacker behind the computer (tablet in this case). You have hacked into many billionaire mansion security systems, and your accomplice is to go in and steal a valuable. First, you need to plan out their path, tracing it out with your finger as when they go in, you cannot control them. While doing that, you will want to observe guard patrol patterns. Like the thief game, these guards have vision cones. Now, when your accomplice enters the house, it is up to you to cause distractions for the guards. Ringing phones, flickering lights and turning on house hold appliances to attract the guards attention away from their patrol and your accomplice's potential route.

This game has core idea of distraction. Distract the guards while your accomplice burgles the house. It has mechanics from there, expanding out from it, still connected. Like drawing the guards attention in many ways. It is also built for a touch device. You draw out your accomplice's route and tap on distractions to trigger them. We believe that this idea is much better than the last in both design and scope. 

Dev Diary - Project 3: The Initial Pitch

As mentioned in the previous dev diary, I said that we were going with the metroidvania/stealth game. Well as team we blatantly saw that it far too over scoped. The entire map would need to be planned out before we start creating levels, and the design behind these sort of games is very hard. So we went for our original idea of a top down, Thief like stealth game.

Just as a quick note. I'm writing this dev diary after Wednesday, which there will 2 more of these from that day. Things did change quite a bit, so keep that in mind.

When brainstorming the game, we came up with many ideas for cool things. Like hiding in cupboards to avoid guards, smoke bombs, fire crackers, the whole lot. Now we knew obviously that this stuff wouldn't be included in the pitch. So we stripped down the game to its "core" mechanics and started out a script from there.

It took forever to figure out a game name, with us finally coming to a decision of "Rob Em Blind" after a long time and a large list of other ideas. The team name took even longer to figure out. We wanted it to reflect both us as a team, as well as the game. Before class, we were going over a lot of potential names. It wasn't until we began the other team's pitches, that we quickly chose "Team Sneaky". Not really the most unique or thought out name, but it was what we had to go with.

From there, our pitch went over how it was set in the Victorian era and how you as a thief, played the game. Vision cones, sound waves and the objective of the game were explained and we were pretty confident that the audience could picture it in their head.

After the pitch was presented, it was feedback time. Overall, people liked the Victorian setting and thief theme. There was some criticism though and confusion among the audience. The main points were:

  • The scope is too big.
  • Levels take too long to complete.
  • It should be turn based.

We agreed with most of the points presented, except for the fact that it should be turn based. In our minds, this was a game about pre-planning and execution. You observe guard movements and then move in, dodging the vision cones and timing your moves. That was the sort of experience we were going for. Tense and risk vs reward situations.

After all the pitches were done, we were talked to as a class. In some way or another, every one of the pitched games was a dungeon crawler. This wasn't really a bad thing, just something that the lecturers wanted to steer us away from. Then, we had to strip down our games to its core mechanic. Ours was "traversal". Moving around. Not that fun or engaging on a touch device. We as a team, saw this as a problem. So we created a new game.

Dev Diary - Project 3: Brainstorming Ideas

Today in class, we were assigned our next project. To create a game in teams, which loads levels from ascii map or csvs files. It has to be on an android tablet and have a minimum of 50 levels.

As a team we began to brainstorm ideas. The obvious "dungeon crawler" game caught our minds and we went from there. The animation students were previously doing an assignment in the style of steampunk, which everyone agreed would also be good for this project. Then with the idea of steampunk in mind, we though that maybe each level could be on an airship, where the player needs to go around repairing them.

Except, that idea was scrapped.

Many of the other teams had brainstormed dungeon crawlers, and the lecturers weren't that enthusiastic about that sort of game. So from there we kept the steampunk idea and thought of a Thief style of game. Where the player would sneak around different houses, stealing goods to sell later on. It was generally accepted by the team, yet upon further talk about it we decided to take another approach.

We would keep the steampunk and stealthy stuff, yet change the different houses (levels) to one big level. The game would essentially be a metroidvania. The player is a robot who is trying to escape a robot factory. Along the way, different upgrades and tools can be found and all other systems that are associated with metroidvanias.

Studio 1, Project 2 - Post Mortem

This trimester in Studio 1, we as a class turned the original Up Ship Creek board game, into a hex based exploration game. Along with that, the class was divided up into teams to each create a new scenario as well as common items, hazards and condition cards. This post mortem will focus on both working as a class, and working in the smaller team.

Time Management

The most significant problem with the project, was time management. Tasks as a team were done only days, if not the night before they were due. This didn't directly affect the quality of work, although most certainly it would have been better if the time was spread across the week. It did in a way make the team feel kind of disconnected. We only ever really done work on a Sunday or Tuesday night outside of class, clumping all that needed to be done in just one night. In the end we did get the required work done (most of the time), yet leaving such a tight time margin, did remove the ability to alter the project in a major way. For me, this isn't new. Time management is something that I have struggled with in many past assignments. I always just say "i'll just do it tomorrow". The work only really gets done though, when tomorrow is the day it's due. In previous post mortems, a paragraph similar to this one has been said, yet nothing really seems to be changing. One thing I have noticed though, is that when HacknPlan tasks are assigned and timed at the start of the week, the work will generally be done across the week. In the case for this project though, HacknPlan tasks were written out in the middle of the week, or when the tasks were being done.

So, how can this problem be fixed? Like I said above, in some previous projects where HacknPlan tasks were assigned at the start of the week, work was done properly. This is probably because if you have an empty HacknPlan milestone and only create tasks once they've been done, it looks as if there isn't any work to do, or that the work is flexible. On the other hand, if the tasks are there and set for the week, you can see the amount of work you need to do. The exact hours it will take, so you can chip away at it throughout the week. Having someone (most likely the project leader) organise all the tasks for the week and plot them out in the HacknPlan milestone, this will not only make things more organised, but it will set an objective. People will see what they've done and what they haven't done. Thinking in your head that you have to do ten hours of work on a Sunday night, compared to thinking that you need to do this and that Sunday night, is much more daunting. 

Playtesting

Playtesting the game was both great and terrible. Since Up Ship Creek has so many systems in play and the fact that we were making a totally new way to play the game, playtesting it was hard. Not setting it up and getting people to play the game. Or even having them understand the rules. In my mind, what was hard was getting the playtesters to play the game from a perspective of an average player. Early on in playtests, my team would get the testers in and explain the rules to them verbally. Even at times, during explaining the rules, we would say something like; "you'd want to avoid that though", or "this is what you want to get". In a way, we were telling them how they should be playing the game, not how they could be playing the game. This would make their experience different from an average player who goes and buys the game from the shop. Even during play we would say stuff about saving items or good strategies for later on. We were playing the game from a developers perspective, when we should have been playing the game from the testers perspective. Later on, when a rule book was being produced, playtesting still had this effect in a way. As a team we kept on telling the testers to "refer to the rule book" when they asked a question about a system, yet still when playing the game casually, we slipped. It creates impressions in the testers mind, removing the aspect of "should I do this, or this?" a bit. 

The obvious solution would be to not say anything. For when we didn't have the rule book, we needed to talk, so the rules could be explained. Even when we did have it, casual talk and strategising in-game, allowed these "developer perspectives" to seep in. Not talking at all or very minimal during play would not be ideal. The entire point of the game is to talk with each other and stratagise about what to do. A solution would be to "think as the tester". Going in and only really talking about what the tester knows so far. If they are confused, don't tell them what to do. Tell them to refer to the rule book. Not only does it simulate a real playing of the game, it puts your rule book to the test. If there isn't one though, then explain the rules as passive as possible, trying not to give away any possible strategies or indication of how bad/good the system is to the player. While playing, still talk to the testers as after all, it is a cooperative game - just play of their knowledge and don't play the game by yourself. By that I mean, allow the testers to make the decisions. If you are the one choosing where to go and acting as the "captain", then the entire point of the playtest is kind of ruined. Having the testers take lead in a way, and direct the flow of the game, puts tension on the systems. Will these things work? Will they integrate seamlessly with the rest of the game? Will they not be too harsh/too easy for the players? The only way to test these hypothesis', is by having testers with open minds, who are not persuaded by the developers. In some cases where we kept telling the testers to "read the rule book", it sunk in more and made them talk between each other on what to do. Compared to when we told them the rules, with some bias mixed in, they would just follow what we said, not strategising. 

Working as a Class

Something that I was a bit concerned about at the start of the project, which turned out to be quite a surprise, was working as a class. By this I mean coming up with new ideas and iterating upon existing ones. Someone would come up with an idea, the class would talk about it, then we would write it down and get it ready for playtesting. Even outside of class, we had a Discord server, where the whole class could come together to collaborate, ask questions and even have a few meetings. Later on when we had a rule book to work on, sections were done usually by an individual person, then the class would go over them. I recon this behaviour came from the class not really having anyone be a control freak. Of course there were individuals at time who would take charge when things got slow or out of hand, but no one ever had total control of the project. This can be both a good and bad thing. In one case when our lecturer wasn't in class, there was a debate over hazard tokens vs hazard tiles. Since there was no "leader", a final decision was only decided after some time and vote of hands. If there was a leader in that case, they could make the final decision so that the class could get onto the next point at hand.

As mentioned above, the main reason I think the class worked well as a dynamic, was because there was no one in total control. Arguments were rare as generally once a suggestion was made, it was talked about, then agreed upon and set for playtesting. In practice, this may not be possible. There may be people who view their opinion as greater than others. To combat this, it's the class' responsibility to view everyone's opinion as equal. You need to allow different people to talk and listen to their suggestions and reasoning behind ideas. This not only creates an equal work space, but a civil one. Outside of class, Discord was a necessity for us. Setting up a server allows you to not only share ideas and images, but also have voice meetings. You can see who's online, allowing for members to gather the class for meetings and discussions at anytime. This needs to be done at the start of the project. Because it sets a standard means of communication outside of class. If it is set up half way through, people will view it as just something to the side. Yet if it's integrated into the class workflow from the beginning, people will be more inclined to use it. Just like with time management above. Setting a standard from the beginning for me and probably others, cements in place a pillar, holding up the project.

To conclude, the project overall went quite well. A part from time management issues and changing perspectives for playtesting, the final product was a solid "new" board game, with a fairly solid scenario from my team. Working as a class was better than expected as a lot of the time, working with more people is a challenging. Yet it seems in the end it worked out pretty good.

Dev Diary - Project 2: Final Playtest

Today was the last day to work on the project and playtest the game. As a class, our main objective was to test out the new rule book, to see if it's cohesive and easy to understand. My team had 2 animators come in, who have never played the game before. The rule book was given to them and after they read over it, we decided to play the game.

They understood fairly early on, the initial game setup, round phases, tile placement and tokens. One of them did try to connect a blank tile to a path though, which I think is due to our diagrams not showing blanks. There is an image that displays what valid placement of tiles is, compared to non-valid placement of tiles. The image though, doesn't show a blank connecting only to blank edges, so the misconception was understandable.

Overall, the playtest went well. Whenever they asked a question or didn't understand a mechanic, I always said to try and find the answer in the rule book. Throughout the playtest, I was constantly referencing the rule book, since that was the main thing we were trying to test. Here's some of the issues that they had with the rule book:

  1. They were constantly flicking through, trying to find different mechanics. They suggested we have each category on a separate page. Hazards, tokens, tile placement, etc, each on a separate page so that it is much easier to navigate around and pick out what you need.
  2. There was some contradictory information. This was minor, but things like the number of tokens in the game and some tile placement rules were different around the rule book.
  3. There was information missing. How condition cards work and how the cat enters the game were elements that were totally missing from the rule book.

These issues are mainly small errors and formatting problems. For the actual flow of the game and conveying the order and process that things happen, they said it was good. And that is what we were mainly trying to do. Previous versions of the rule book were just the game mechanics thrown under headings. There was no start point or order of play. It left the playtesters asking more questions, the more they read. Now though, the rule book seems to be mainly intact and usable in a real world situation. This meaning that if we gave it to a bunch of strangers and left them to their own devices, they should be able to play the game the way it was made.