Dev Diary - Barnstorming Remake: 3D Human

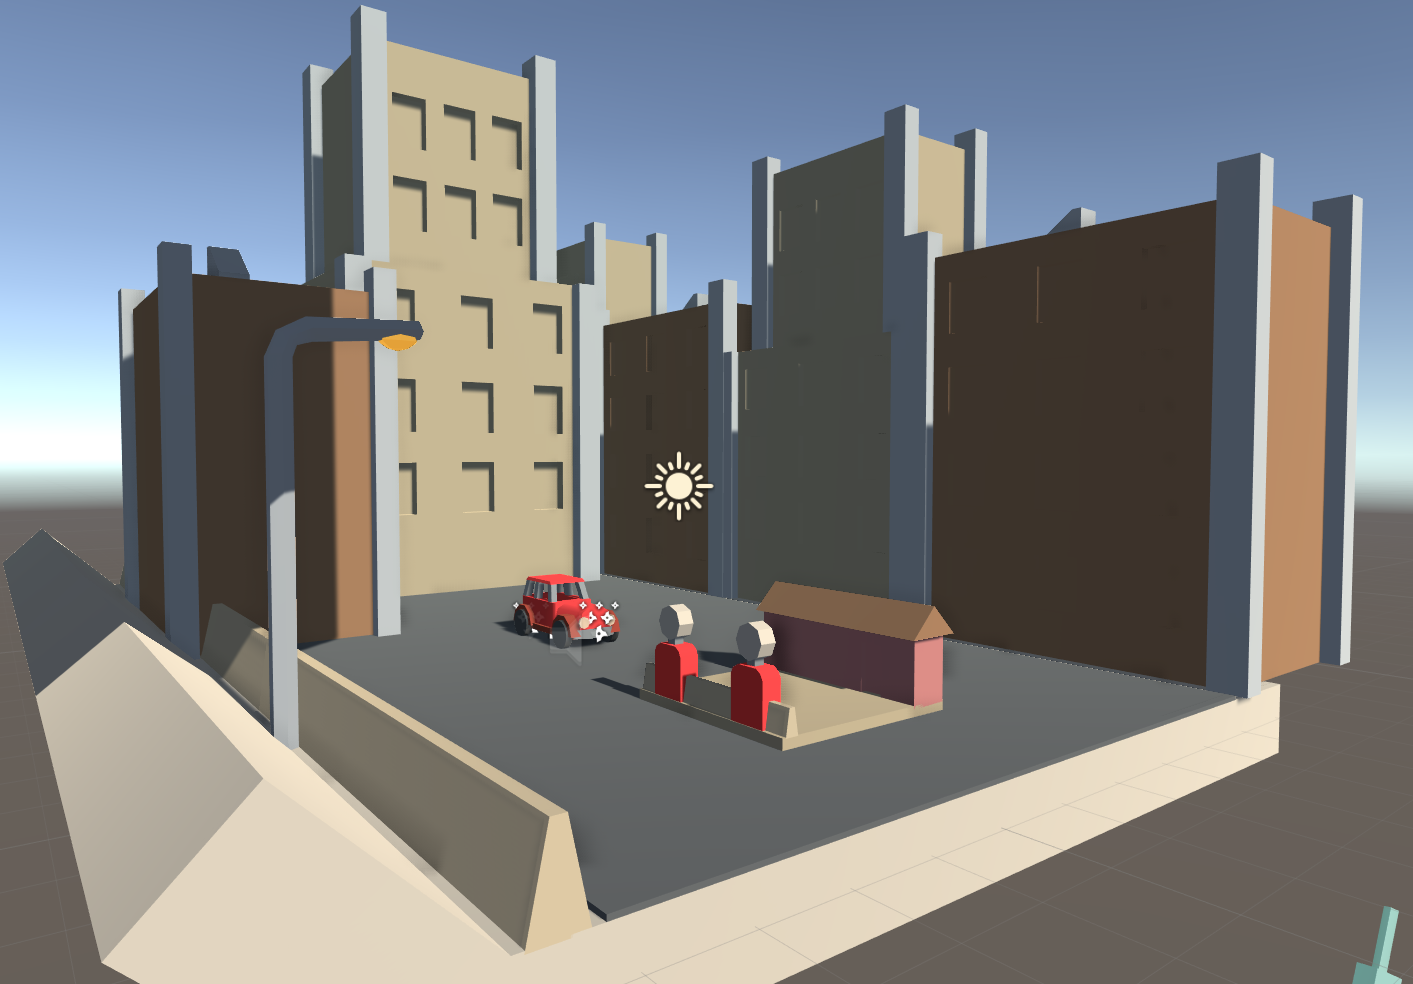
The model to the left is of a human (by best attempt) and is used later on in the game for when the player gets closer to the house. 

This model took me the longest out of all the others. Why? Because it was my first time ever creating a humanoid. Before I made trees, a car, logs, etc. For some reason creating humanoid anything really, is something I struggle with.

Even with making pixel art, the hardest thing to do is creating the characters. I believe that when making these things, it is hard because we want them to look perfect.

They are the avatars that we focus on the most when playing games, so if they are off, people will notice.

fdsafdsa.PNG

The process started with a simple cylinder. Then I divided the base of it into 2 and extruded out the faces to make the legs. Edge loops were inserted around the torso and legs so that the body could form.

The feet were done by selecting the front few faces and extruding them outwards. Quite a bit of tweaking vertexes was done so that the foot shape came out.

The arms were the hardest part. Like the legs, they were extruded from the top of the cylinder and initially put into a t-pose. Since I wasn't going to animate the model, a t-pose was a bad idea, so after a while of moving individual edges, faces and vertexes downwards the general size of the arms were complete. From there, adding edge loops and moving vertexes around was done to give the arms a similar look to real ones.

dddd223232.PNG

A problem I did run across though was somewhere in the extruding process. It seems some of the faces were missing or are backwards. I'm not an expert on the subject so I can't track down the exact reason why it happened.

Once the model was complete, it was added into Unity and the material was applied. For it to look at the car though when it goes past, that was the easy part.

transform.LookAt(target.transform);
transform.eulerAngles = new Vector3(0, transform.eulerAngles.y + 90, 0);

We make the model use the LookAt function to look at the target, but that also rotates on the x and z axis. We don't want that. So we set the x and z angles to 0, while adding a 90 degree offset to the y axis. This is only because the forward direction on the model was not the direction the human was facing.

Dev Diary - Barnstorming Remake: Screenshake

From reading the other posts, it can be seen that player feedback is a pretty important thing in my mind. It adds to the experience and provides instant confirmation on things happening. The player shouldn't need to look at the number of gas stations remaining to see if they did indeed go through it or if it was a miss. There should be both visual and audible feedback to tell the player.

So in my game, when a player hits an obstacle, the screen shakes. The camera is in a train and makes no sense what so ever for it to do so in a real world situation. But this is a game and sometimes doing things that would for certain never happen in the real world, makes the game world more believable.

The screen shake isn't seen at its full potential in the above gif as the frame rate is too low. In-game though, the camera jitters along the x and y axis for a short period of time. So how does this work?

Well when the camera is called to shake the screen it requires the sender to provide 3 values. A duration, an amount and an intensity

  • Duration is the total time the screen shake will take place for.
  • Amount is the distance between the shake points.
    • A low number would make the shake small.
    • A high number would make the shake large.
  • Intensity is the speed at which the camera moves to each of the shake points.
    • A low number would make the shake slower.
    • A high number would make the shake more violent.

So how does the screen actually shake? What's the code behind it?

  1. First we get the initial camera's position and make that the original position.
    1. This will be used once the shake has ended.
  2. Then we set the target position:
    1. targetPos = originalPos + (Random.insideUnitSphere * amount);
    2. This returns a value in a spherical radius around the camera.
  3. Then we simply lerp towards the target pos at the speed of the intensity.
  4. Once we're at that, repeat the above steps and stop once the time elapsed is greater than the duration.
231232w.PNG

This is one way to do camera shake. I know that i've been using this same system for my games in the past and it works well. Of course there are many other ways to it but this is the way I know best and it's very customisable. 

Dev Diary - Barnstorming Remake: Particle Effects

In the game, there are 2 particle effects. The first being the smoke coming out of the exhaust, and the second being the one when the car collides with an obsticale.

I really don't like the look of the default particle texture, so I changed it to the sprite default one. This makes white, square particles which in my opinion fit well with a low poly game.

The exhaust particle effect simply emits particles backwards, with them being a mix between light grey and dark grey. They fade out over time and have some random movement along the x and y axis. Also, there is a gravity modifier, moving the particles up into the air and a rotation applied to the particles.

One cool thing though, is that the rate of emission is tied to the car's horizontal velocity. The formula to calculate that is:

rate = Mathf.Pow(rig.velocity.x / 2, 3)

This is an exponential curve which increases quite a bit as the speed increases.

When the player collides with an object, along with bouncing back a sound and particle effect is played. The particle effect is quite important as it provides the player with visual feedback and makes the world seem whole. When you hit something like a log, you'd expect there to be a puff of dirt, wood particles and smoke. 

This particle was made in a similar way to the smoke one, just with the particles emitting from a sphere and disappearing quite quickly. I didn't want to clutter the screen with the particles sitting around for a while as even a small duration of them tells the player what they need to know.

In deciding what colour to make the particle I was a bit stuck. The player can hit both fallen trees and gas station colliders. Both are different colours. So I decided to go with a similar colour to the ground. It looks like a dust cloud and is much easier than figuring out what the player hit, then changing the patrticle colour based on that.

Dev Diary - Barnstorming Remake: Creating the City Tile

In previous builds, the player starts out in the forest and plays from there. What I wanted though, was for the message of leaving the city to be clear. So I had the first 6 tiles of the game be set in the city, introducing the player to the concept of gas stations and allowing them to move around to get a feel for the place, before they are chucked into the world.

dddd.PNG

The overall position and size of the wall colliders are the same as the forest tile. It's just the visual look that's different.

  • The road is dark to look like tarmac.
  • The wooden fence is replaced with a concrete barrier.
  • The trees are replaced with 2 different buildings.
  • And there is a lamp post.

I started off the buildings with a simple cube. It was stretched out in scale and for the building to the left, I added some edge loops and extruded a face upwards. It created a second layer.

Then I made thin pillars and placed them at the edges of the buildings. This is because looking back at images of those old fashioned buildings, their architecture is quite complex and there is a lot of detail.

Since I went with a low poly style, doing these pillars added some of that style and made them not boring to look at.

dddw.PNG

The lamp post was a bit more complex. Making it curve at a 90 degree angle was not as easy as I expected.

What I done, was I selected the top face of a cylinder and extruded it out a bit, moved it along the x axis and rotated it a bit. I done this 2 more times until it started to go horizontally, essentially making a low poly curve. 

The light bulb was just a sphere object, squashed down on the y scale to make it look like an oval.

dsassss.PNG

In-game, the light bulb has material which has emission enabled. This makes the light bulb appear to glow a bit. For on the Midnight level, these lights hand a spotlight attached and making the object emit a bit of light adds to the illusion that it is the source of the spotlight.

For the materials of the City Tile, it is just like every other material in the game. The metallic and smoothness values are turned right down to 0. This makes the surfaces not look shiny or reflect light at all. Having it do so would first of all, make the game slightly laggier (not really an issue), and second of all: follow the art style. Edward Hopper's paintings had colours which were pretty flat, de-saturated and not really that reflective.

Dev Diary - Barnstorming Remake: Level Generator

All 3 levels of my Barnstorming remake are made by generating the level in real time.

dddw.gif

From seeing the gif above, it shows that as the camera moves (following the player), new tiles are added and old ones are removed. Across the 3 levels, the way the levels generate are not that different, except for very small changes.

When the game starts, it generates the first 6 tiles. These tiles are all city tiles, which don't have any game elements on them and are just there to give context to the game. From then on, the game will spawn in forest tiles, which have a whole set of rules to determine what is placed where and how often.

Let's start by spawning in a tile...

Its position is determined by the last placed tile. We get the position of that and set our new tile's position to plus 10 on the x axis. This places it right next to the previous tile.

Then we check if a gas station should spawn on the tile.

  1. By default, the chance is 20%.
  2. If there was a gas station on the previous tile, then the chance is 5%.
  3. If there was a gas station on the previous 2 tiles, then the chance is 0%.
  4. We roll a random number and if it is less than our chance, the gas station gets placed.
  5. It's a 50/50 chance whether or not it will be placed on the top or bottom of the road, with a 30% weighting to the side that was not of the last gas station.
    1. So the last gas station was on the top of road, the next one will have an 80% chance to be on the bottom and vice versa.

If a gas station wasn't placed, then we check to see if we should place a fallen tree.

  1. Fallen trees have a 50% chance of being placed.
  2. If we can place one then we need to choose if it will be coming in from the bottom or top of the road.
    1. If the last fallen tree came from the bottom, then this one will come from the top and vice versa.
    2. It's an alternating pattern, so the placement is predictable.

No matter if there's a gas station or not, we check to see if we can place potholes.

  1. 50% chance to place one, 25% chance to place 2 on the same tile.
  2. If the level is Dusk, then there is a 10% more chance of placing them.
  3. If we do place them, their positions are determined by choosing a random X and Z position.
    1. This is done so that the final position is inside the dimensions of the road.

If this is the last tile of the game and all gas stations have been gone through, then we need to place the farmhouse.

  1. Pretty simple, this tile only has the farmhouse on it.

Dev Diary - Barnstorming Remake: Sound Manager

The Sound Manager was one of the last things to be implemented into the game, yet none the less a very important one. For playing the game, audio feedback is as important as visual feedback. I didn't get to implement all the sound effects into the game. Music was one thing that is missing, but for a small game like this, it's not that necessary. 

fdsafdsa.PNG

These are the sound effects that were used in the game. All of them were taken from FreeSound.org except for two. The "Collision" sound was made by me in Audacity by mixing together 3 different sounds. A metal hit, wood hit and a punch sound effect. I couldn't find a proper quick car collision sound on freesound.org, so I had to make one.

The second sound was the "GasStationPassthrough" sound effect. That was made by first getting a gas filling sound effect and increasing the tempo overtime to 200%. Then having a bell ding sound effect afterwards. It's a quick sound effect so that the player can easily tell when they've gone through a gas station.

The car's engine sound is tied directly to the car's horizontal velocity. The pitch was changed to emulate the engine moving faster. The formula used is:

pitch = (xVelocity / maxSpeed) * 2

On the menu, there is a small speaker icon. Clicking this, either mutes or un-mutes the audio. I saw through testing the game in the editor, that I was constantly muting the audio in the game screen. The car's engine noise was annoying at times and I thought that for people playing the game, the problem could also be there. So an audio toggle button was added.

It's quite simple. When you click on it, it checks whether or not the three audio sources are enabled or not. If they are, then disable them, if they are not, then enable them.

Speaking of audio sources, there were 3 of them.

  • The car's AudioSource.
  • The car engine's AudioSource.
  • The train AudioSource.

Why is there an audio source for both the car and it's engine? Well since the engine sound effect is tied to the velocity and its pitch is changing constantly, if the player was to hit something, then that sound would be wildly different. So having the engine audio source just play the engine sound and having the car audio source just play collision sounds, that would fix the problem.

dsadsa.PNG

Now, how were all these sound managed? Well, they were all controlled by the SoundManager.cs script. Whenever a sound needed to be played, a function in this script was called.

An alternative would be to just play the sound in whatever script was responsible, yet that would be a mess. Having all the sounds in one place, managed by one thing is easier to manage, fix bugs and implement upon if new things are to be added.


Dev Diary - Barnstorming Remake: UI

In my Barnstorming remake I went for the approach of world space UI, instead of UI that follows the face of the camera. The menu is at the back of a chair inside of the train, while the game UI is on the train windowsill. 

gggg.PNG

I went with a constant theme of this old fashioned font, and a yellowy/white colour. This makes the text look like it came from those old times. The font I used is called Berlin Email. It's pretty easy to find a wide range of fonts like these. I used the website DaFont.com which is probably the largest free font website out there. 

For the canvas, it was set to world space and resized so that it was at the back of the train chair. A problem with doing that though, is for me, the units were still correlating to pixel size. Before the canvas was large and at a width of 1920, now it was small and at a width of around 3. When new text was added, it was large and low resolution. To fix this, simply set the X and Y scale of the UI elements inside of the canvas to 0.01 instead of 1.

The help screen was made to look like an old newspaper of leaflet. I made the image in Photoshop, by simply having the beige background and adding in 4 brown bars with a shadow on each. 

In Unity though, I was going to be using this for many things, like the help screen, lose screen and win screen. And they were going to be different sizes.

To compensate for that, in the Sprite Editor, you can modify the border. What this does, is that you can make it so when you resize the image, some parts remain the same size. So you don't have to make seperate sprites for each sized background you want.

fdsfdsfsd.PNG

Above is a gif showing of the interactivity of the UI. I wanted the buttons to feel good and have the player know full well when they're hovering or pressing one. 

When the mouse cursor enters a button, it calls a function which sends its game object over with it. The scale is then multiplied by 1.1x and divided by 1.1 when the cursor exits the button. Unity's default button component also has a colour change when hovering, pressing, releasing, etc. It can be seen when the button is being hovered, the colour turns more white and when it's pressed it turns darker. 

Another element is the help screen. Originally I had it so that when you pressed the "Help" button, the screen just appeared, yet having an animation for it slide upwards makes a big difference in how you feel. It feels like it could be something in the game world, rather than just an abstract visual element. It feels like the player themself could be lifting the card up to their face to read it.

Now for the in-game UI elements. The level select buttons work the same as the ones on the menu, so not much different there. At the top left of the screen though, there is the gas stations remaining and the time elapsed so far in the game. 

To the left is what you see when you go through a gas station. Originally though, the number just changed with nothing special added on top. Through playtesting though, and especially with people who haven't played Barnstorming before, they didn't know if they were doing the right thing when going through a gas station.

At the time, there was only a small little flag pop up on the gas station, but in some parts of the game that isn't visible.


So for UI feedback, I made the text "pop". It's a simple animation, affecting the scale, position and colour of the text. This makes it so the player's eye sees this when they go through a gas station. Did they do something right? The text popped out as green so probably!

fdsafds.PNG

When the player goes through all the barns and arrives at the farmhouse, they are presented with the win screen. It tells you what you have done, the time it took you and your highscore for that level. You can also click the menu button to go back to the menu.

It's also easy for the player to see if they have beaten their highscore or not. The "Time Taken" text will be green if they have, or red if they haven't. Making it the same colour as the highscore text would just make the player count the numbers to determine that. Having the game quickly display whether or not they've beaten their highscore allows them to quickly hop back in and try again.

Also, with this image you can see the background at a different size. There is also a brown border around the image. This was made not in Photoshop, but in Unity using the Outline component. 

Dev Diary - Barnstorming Remake: Visual Features

In Barnstorming there are 4 different levels, each having their own difficulty level. In my version of Barnstorming, there are 3 levels, with not really any difficulty change, just different number of gas stations you need to go through and the time of day.

The first level is at Dawn, the sun is rising and in front of the player. The second level is Dusk, where the sun is rising and behind the player. Finally, the third level is Midnight, where it is dark and the only way for the player to see is by using their headlights.

The different elements that change for the visual look are:

  • Directional Light.
  • Player Headlights.
  • Gas Station Lights.
  • Fog.
  • Camera Background Colour.
  • Ambient Colour.

In script, when a level changes, the game checks which level is it changing to, then it changes the corresponding elements to create the look.

Dawn

  • The directional light rotates to face the front of the car.
  • The player headlights are disabled.
  • Gas station lights are disabled.
  • Fog (greeny colour) is enabled.
  • The camera background colour is set to a light blue.
  • Ambient colour is set to a de-saturated light blue.

Dusk

  • The directional light rotates to face the back of the car.
  • Same settings as above.

Midnight

  • The directional light rotates to face under the game space.
  • The player headlights are enabled.
  • Gas station lights are enabled.
  • Fog is disabled.
  • The camera background colour is set to black.
  • Ambient colour is set to a very dark blue.

Above is what it looks like at Midnight if the fog isn't disabled. Since the fog is green the buildings stand out. 

Now this is it without the fog. It looks like night time, yet with the buildings still appearing bright, as if the lights are on in them. The reason why the buildings are so bright compared to all the other objects, is because the directional light is rotated underneath the game tiles. Since the buildings are low down and in the open, the light can get to them.

Here's another example which isn't in the game. The directional light has been turned off and the buildings at the back are very dark. I thought about having this feature, yet in the end, the buildings lit up was still more visually appealing.

gfdsgr.PNG

For the car, the 2 headlights each have their own spotlights. Also if you look closely, you can see that the actual headlight objects are more visible than the rest of the car. This is because they have emission enabled on their material. They emit a bit of light so that it looks like the light is coming out of the objects and illuminating the casing.

The same goes for the "Phillies" sign. The material has a green emission on it, so it looks like the letters are emitting light. Although the light emitted from materials don't interact with the world or create shadows.

GIF.gif
ggg444.gif

There are also a couple of small animations added to add some "juice" or feel to the game. Colliding with a solid obstical plays the collide animation which just adds a little something, making it seem like the player actually hit an object, rather than just bounced backwards from hitting it.

The flag popping up on the gas station though, is more for visual feedback. In the final game, going through a gas station: pops up the flag, plays a sound effect and has the gas station UI "pop". 

Dev Diary - Week 4: Playing Up Ship Creek

This week in class, we were introduced to the Studio 1 made game: Up Ship Creek. I was fortunate enough to be one of the three people to play the game and I really enjoyed it. The first thing you notice, are the large amount of mechanics. The 6 on-board card holders, characters, items and systems needed to be done each turn creates a certain experience.

One which makes the player feel as if they are on a spaceship in a hectic situation. Hazard zones, rolling on luck (in a way) and being under time or turn pressure adds to the experience. Every decision matters and the constraints (time or turns) impact that. If the team is under a time constraint, then it will be a mad rush normally. We got into gear and headed straight for the objective, not picking up items and generally not planning ahead for where we will be for the next crisis. Whereas, when there was just a turn constraint, taking out time was much more common and we went over multiple different plans of attack before committing. This relates back to how a situation like this would really go down. If there was a real life time constraint, then there would be a mad rush to get whatever is causing the countdown to stop. Whereas if time is not a problem, then the situation can be approached from a more thought about point of view, focusing both on what needs to be done now and how we can make it easier for ourselves in the future.

A system in the game that confused me a bit while playing, but is clear now, is the rolling of dice. If you land in a hazard zone, then you are rolling against the board for the lowest number. Whereas if you are attempting to "complete an objective" (beating a condition card), then you are rolling against the board for the highest number. This is because hazard zones are more generous to weaker players, where as the condition card roll is more generous to players with the required resource. If we flipped the hazard room around and made it so that rolling the highest number grants you victory, then they wouldn't really feel like a hazard. You send the player with the most health or the most stats off to do the dirty work, because if they get affected somehow, it will be less of a blow to the team. It makes hazard zones less of a "why bother going there, I'm low and probably going to die", and more of a risky chance.

Another interesting thing that was told to us after playing which we didn't even think about, was our starting positions. Each story has a different starting room and the placement of the players actually matters. You want the people with the least action points closest to the exit of the room, and the people with the most, you want further back. We started totally at random, with out 3 players lined up, not in action point order. If did, then the start of the game would probably have been easier as we would have been able to move around further.

Dev Diary - Week 3: Playtesting

So today in class we were doing playtesting. I had a pretty solid build down, with a functioning game and win state. I had a few people play it and overall they enjoyed the game, they said that it was well polished, yet with everything else there were a few problems.

One thing that I knew was going to come up was the level generator. It's not fully flushed out yet, so there can be potholes that spawn in gas stations and some gas stations are impossible to get to. This was brought up in the playtesting.

Another thing was the car controller itself. At the moment I am getting input directly from the up and down arrow keys. A playtester suggested that I should instead get the vertical axis as that would allow for the W/S keys, as well as controllers. I tried it out yet as I suspected, it felt "floaty". There was a short time it took from pressing down a button to the car to move up or down at the full speed. The small speed up time didn't feel right, as the layout of the game is set up for quick tactile movement. A "floaty" controller would probably be more realistic, yet for a quick, challenging game such as Barnstorming, that isn't necessary.

On final thing that I think is pretty necessary and which is part of the project, is to convey the artists message in the game. For my one, I'm telling the message of getting out a big, lonely city and going to a comfortable country town/farmhouse.

At the moment, there's not much conveying that but for a quick sentence at the start of the game, a paragraph in the help screen and the farmhouse at the end of each level. I've thought about it and ways the message could be conveyed are:

  • Starting the player of in a city and after like 10 seconds have it transition to the country.
  • Have more and more people at the roadside or at the gas stations as the player goes through more of them.
  • Have the sound of people talking on the train increase as the player goes through gas stations.
  • Maybe, have the amount of gas stations increase, the closer the player is to ending.

For this playtest session, I didn't have a questionnaire. Next week though, I will certainly have one so that I can narrow down problems. Some questions I've been thinking about that I would like to know from playtesting are:

  • How easy was it to control the car?
  • What do you think the game was trying to convey?
  • How easy did you find it to avoid the obstacles?

That's all for now, hopefully next week's playtesting goes well.

Dev Diary - Week 2: Asset Creation Method

For my game I"m using mainly 3D assets with only a small amount of 2D ones. For the 3D assets, I've been using Maya and for the 2D ones, I've been using Photoshop. 

fdsa.PNG

For the fallen tree asset, I started in the feature spec, just drawing a simple image. This one was to demonstrate the hit box.

Then, I go into Maya, and begin creating the model.

I first made a cylinder object, then made the curved face into 8 sides. This follows the theme of the game being low poly. Like in the "reference" image above, there are small branches poking out, so I used the edge loop tool to divide up the log. Simply extruding the faces, moving them, scaling and rotating them was then done to make the branches look natural.

Once that was done, the model was exported as a .FBX to the unity assets folder, along with the Maya file, so that I could easily edit the model in the future. Implementing it into the game is the next step of the process.

For this object, it will be either spawning on the top or bottom of the road, poking inwards. So I get the model in the scene view and make it a child of an empty game object which is in the centre of the road. Simply inverting the Z scale of the parent game object flips the model to either side of the road.

A box collider was them added and the object was tagged as "SolidObstical". All the rest is done in the code, where it is spawned and placed in the game world.

As for the green appearance of the log though, that is just a placeholder material for now.


For 2D assets, Photoshop is used. In the case of the pothole object, it is a sprite that is placed onto a quad in the game world.

In Photoshop, a white oval with some outline detail is created. The reason it is white, is because in Unity, the colour can be tinted to be whatever colour is needed. So if I was to change the road colour or if the pothole was too dark for example, I wouldn't need to go into Photoshop and change the colours around. All I need to do is move a simple slider inside of Unity.

Once the sprite is complete, it is saved as a PSD to the Unity project asset folder, ready for use.

To make it an object in the world, first a quad object is created. Then a material with the sprite as the texture is made and placed on the quad. The material is set to cutout, so that the transparent parts of the sprite are transparent. Then a simple sphere collider is added, and the object is tagged as "NonSolidObstical". 

That is it. It's pretty much a repeated process for all the 3D models and 2D sprites in the game.

Dev Diary - Week 1: Barnstorming Pitch

For Wednesday, we were assigned to make a pitch video about our Barnstorming / randomly assigned artist game we were going to create. I got the artist Edward Hopper, who was a prominent American oil painter back in the early 1900's. This is the video I made:

As you can see, I wouldn't consider it that much of a pitch. That's because at the time I didn't have a proper idea of what I was going to do. Since his paintings were quite realistic and his ideas of solitude and loneliness were quite abstract for me, implementing that into Barnstorming was not an easy task.

What I did end up going with though, was this:

The player is a car driving along a dirt road. They are driving away from the big city, back to the countryside. They need to go through gas stations to progress through the levels and avoid potholes and fallen trees. The player is viewed through the window of a train that is following the car. There will be 3 levels in the game, dawn, dusk and midnight, each with a different difficulty and lighting.

Many of these elements were talked about in the video, as well as discussed during the feedback session afterwards with my group. Feedback was generally good. I did have to explain the odd nature of the video but by the end of it they got a grasp of what I was going on about.

They liked that unlike the original Barnstorming, you can lose my version. If your car gets behind the left border of the train window it happens and my group seemed to like that. They also gave me ideas on what to add like:

  • Have obstacles be cars coming from the opposite direction.
  • Replace the birds with other cars.
  • And some others.

The problem with these ideas though is that it doesn't really go along with the theme of Hopper's paintings. I'm not sure if I explained it well enough in the video, but Hopper was quite a reserved man who saw the crowded big city lifestyle as a lonely one since no one really knows anyone. I want my game to be an attempt to escape the big city life and get back out to the countryside, by the means of many Hopper inspired elements.

Kings of the Arena - Dev Blog #7

Alright, I start uni again tomorrow so this will probably be the last regular dev blog. I'm still going to be working on the project as i'm still enjoying it, just not as often. Now, onto the new features.

Capture.PNG

First, i've added a chat box to the lobby, so that players can talk about what they want to do for the game.

I saw that Photon has their own chat systems, yet for what i'm doing it just seemed to complicated. What I done, was just send an RPC to all clients when a user enters a message. It sends over their player name and message. 

Capture.PNG

Then I added pretty much the exact same chat system for in-game. It's similar to DOTA 2's chat system, where it's in the middle of the screen and disappears after a few seconds. 

That's pretty much it, apart from a few minor additions and changes to existing systems. From now, probably expect another dev blog in around a weeks time, or whenever I implement a major feature.

Kings of the Arena - Dev Blog #6

Alright, in the past 5 days I've probably done the least amount of work on the project so far. That doesn't mean though, that nothing has been done, because stuff has been done.

First of all, I changed the lobby around, so that when you join you are assigned "random team", rather than blue or red. This allows for people to easily switch teams with others if they want, without needing to leave then rejoin again. When the game starts, all players who are assigned to "random team" will be put into a team.

3 players being automatically assigned a team when the game is set to begin.

3 players being automatically assigned a team when the game is set to begin.

Also the 3 game modes have been implemented and are ready to play. Team Deathmatch, King of the Hill and Free for All (which I renamed to Arena).

Team Deathmatch

Team Deathmatch is pretty self explanatory. 2 teams fight to the death, and when the 8 (or whatever) minute timer runs out, the team with the most kills wins. At the moment maps aren't set up, yet when they are, spawns will be random around the map. If there is a tie with the kills at the end of the game, then the team who got the last kill wins the game.

Team Deathmatch UI element, which shows the time remaining and total team kills.

Team Deathmatch UI element, which shows the time remaining and total team kills.

King of the Hill

King of the Hill is a gamemode where 2 teams fight over control of a point. The more players a team has on the point, the faster they will gain ownership of it. When the game timer runs out, the team who has the most control of the centre point wins the game. If there is a tie in control, then the team who is currently gaining ownership wins.

Blue team regains control of the centre point.

Blue team regains control of the centre point.

Arena

Arena is a gamemode where everyone is for themselves. Basically a free for all, after the timer runs out, the player with the most kills wins the game. If there is a tie, then the tying players will have their KD's compared and the one with the best KD, wins.


As a bonus, I also implemented Druid's 2nd ability which is Speed Aura. For 5 second (stats will probably change in the future), all teammates inside of the aura will have a 30% increase in attack speed.

This is the first placeable ability and I added it to enchance Druid's aggressive/support playstyle.

Capture.PNG

Kings of the Arena - Dev Blog #5

It's been almost a week since I've last done one of these. It's not because there's a lack of work being done, it's just that there are large features that are being worked on. So what has been happening? Well i've been doing a couple of play tests. A 5 player test with friends was interesting as the game held up and everything worked out fine.

I also worked on quite a bit of networking problems that occured during those tests, these mainly being synching issues.

dsadas.PNG

A scoreboard was added, which displays player kills, deaths and ping. It also shows the game mode, current map and rules for the game mode.

One of the largest features I added since last time, is a menu with a lobby screen and lobby browser.

What you see in the above GIF, is a player creating a lobby, then switching the game mode for the game. Other players are joining the lobby and then the host starts the game. What I don't like about it though, is the way the teams are set up. When you join a lobby, you are automatically placed in a team and swapping teams can only be done if the conditions are right.

A better solution would be the way Shellshock: Live does it. They have a lobby like this, but each player can switch from no team, to a team. This would allow for people to easily trade teams with each other, rather than needing to leave and rejoin the lobby as it is now.

browsergif.gif

This here is the lobby browser. It displays all lobbies for players to join, along with their game mode and player count.

Kings of the Arena - Dev Blog #4

I've been working on the game for quite a bit lately. Additions to the ability system, UI, projectiles and more have been worked on. I also had my first proper play test that isn't just me trying to control 2 games at once. My friend and I spent around 15 minutes messing around in-game. Overall, it was better than I expected.

Before hand, I though the first initial gameplay was going to be unbalanced and not that fun if you're just spamming projectiles at each other. Yet when playing with another person, we both found it to be quite fun. Trying to hit our target by predicting movement, and using the abilities at the right times to give ourselves an advantage. The experience was great and I can't wait to test again, and with more people.

Archer's Fury ability. Temp extra attack speed.

Archer's Fury ability. Temp extra attack speed.

Archer's Poison Arrow ability. Poisons target overtime.

Archer's Poison Arrow ability. Poisons target overtime.

Mage's Ice Shard ability. Temp stuns target.

Mage's Ice Shard ability. Temp stuns target.

Mage's Shield ability. Temp blocks 50% incoming damage.

Mage's Shield ability. Temp blocks 50% incoming damage.

Cleric's Blood Syphon ability. Temp transfer health over time.

Cleric's Blood Syphon ability. Temp transfer health over time.

Assassins Killing Blow ability. Deals large damage.

Assassins Killing Blow ability. Deals large damage.

Above is a collection of the abilities that I have currently made. The values and stats for each are just placeholders, so what you see above won't be the final result. Each of the abilities also encourages that specific character's playstyle. The Mage has a shield and stun to encourage defensive behaviour, while the Archer has a poison arrow and increased attack speed to encourage aggressive behaviour.

Along with all this, the UI elements have also been implemented, to give the player many visual cues.

When they cast an ability, a cooldown timer appears on the ability icon, counting down in seconds.

If the ability has a temporary effect of the player, then there will be a purple bar above the icon, showing remaining duration.

The circular icon to the left, is just that character's defa

GIF5.gif
GIF6.gif

Something else i've been thinking about is game feel. In a game like this, the player needs to know if they've hit their target or when they have been hit.

So far I have screen shake when you get hit, sprite colour flashes for direct and poison damage, and a blood particle effect when a player dies.

For the future though, I currently have these ideas in mind:

  • Have a red vignette for when the player is almost dead.
  • Have a distinct sound when you hit an enemy.
  • Have the ability icon flash or pulse forward when casting it.
  • Have the ability icon flash or pulse when it is ready to be used again.

When I started these dev blogs, I said that i'll be doing around 1 or 2 a week. Well in the past 1 week and 1 day, i've already done 4 of them. This is good though as I do like making them. In the future though, i'd expect not to do this many as the time to implement new features will just keep rising. Hopefully by next week i'll have done a playtest with around 5 people, just to test how the game goes with that many people, and server issues. 

Kings of the Arena - Dev Blog #3

These posts might actually come out more often than I mentioned. I've been working quite a lot on the project and I think that there's enough progress for an update.

There's quite a lot of stuff to process in that GIF. The first thing you saw, was probably the character select screen. Whenever a player joins a game or dies, that screen pops up, allowing them to select a character to spawn as. 

I've added screenshake when you get hit. This still needs tweaking.

 
Here's a logo that I whipped up. Probably not the final version, but I really like it.

Here's a logo that I whipped up. Probably not the final version, but I really like it.

 
Capture.PNG

That's the character roster. The Druid also finally has a skin. When drawing the sprites for the characters, I wanted them each not only to have a distinct colour, but to also have distinct features.

  • The Archer is the base/default look.
  • The Mage has a beard.
  • The Cleric has a mask and hair.
  • The Druid is bald.
  • The Assassin's face is almost all cloaked and they don't have brown shoes.

I've also been messing around with followers. One of the Druid's abilities, is to spawn a follower that can attack nearby enemies. At the moment it can just follow the player around and look in the direction of the player.

I'm still wondering if it should attack automatically when enemies are nearby, or attack when the player attacks. If when the player attacks, then should it find an enemy in that direction and shoot towards that, or just in the same general

Capture.PNG

Above are the current projectiles that I have made for the game. Look at them and think what a major problem would be in-game... They blend into the ground too much. If you are running around trying to fight other people, a core part of the game is being able to avoid enemy projectiles.

The rock, health shard and ice shard blend in too much with the ground.

Capture.PNG
Capture1.PNG

The fire ball for example. When it moves, there is a trail and particle effect attached to it. It's easy to see.

Then there's the rock, which when moving is not that easy to see. It blends in with the pattern of the grass, even though it's a different colour overall. I believe a solution would be to add a trail like the fire ball or make the rock spin as it's being thrown. This will hopefully make it stand out more.


Since each character will have 2 unique abilities, i've been working on a modular ability system. First, I though about the different types of abilities. These are: projectile, self, placeable, follower and allies.

  • Projectile abilities, are like normal attacks but can have higher stats and different effects attached.
  • Self abilities, are cast on the player themselves. Temporarily giving them extra stats like armour or attack speed.
  • Placeable abilities, are objects that the player can place. Like mines, goo or turrets. These are just ideas at the moment though.
  • Follower abilities, are spawnable creatures that can help the player in different ways. This can be attacking enemies, healing the player over time or other things.
  • Allies abilities, are abilities that affect the entire team or nearby teammates. This can be a heal, armour or other things.
download (1).png

Each player has an Ability Manager, which sets abilities when a new character is chosen, casts those abilities and manages cooldowns. Each Ability class contains the basic data. Like name, description, cooldown, sprite icons. Everything that all abilities have. 

Then there are the 5 (so far) distinct ability classes. These are ProjectileAbility, SelfAbility, PlaceableAbility, FollowerAbility and AlliesAbility. They each are contain data for that specific ability type. Each Ability class connects to one of these distinct ability classes. I know it's not that well explained, just know that doing this allows for modular abilities. So adding new ones or changing existing ones in the future is much easier and faster. 

Kings of the Arena - Dev Blog #2

Alright, so production of the game is underway. My main focus for the past few days has been on setting up the networking and making sure everything is properly synchronised. I'm using Photon for the multiplayer, which is very similar to Unity's built in networking. I've used Photon before on previous projects, so using it here would be the obvious answer.

In the above GIF you can currently see movement synchronisation and client-side hit detection. I'm controlling the player on the left, yet my on the right looks quite weird. The movement looks floaty and not rigid at all. This is due to the clients sending data 20 times second and setting that directly will make the movement look very choppy. So what we need to do is lerp towards the sent position data. This is why in some parts of the game to the right, the movement "jumps forward", as the lerp needs to catch up to the newest position recieved. 


I've also been working on the menu flow. This being the process of which a player gets from being on the main menu, to being in a game.

download.png

When players are in a lobby they will be automatically be placed in either red team or blue team. Only in the lobby can players change teams. They can only change teams though, if their current team has the same amount or more players than the other team.

Also in the image you see "When start conditions are true". These are the conditions for the game to begin. They are:

  • There must be at least 1 player on each team.
  • All players must be "Ready" by clicking the ready button.

Once that is done, a 15 second countdown will begin, allowing for more people to still join, or for players to "Unready".


In the last post I mentioned a couple different game modes, yet didn't really go into detail about them. At the moment I have 2 that I want to implement and another in my mind, just so that the game won't be stuck to one game mode that will get boring overtime. There are a few similarities that all the game modes have, these are:

  • Each game mode can have a minimum of 1 person each team, with a maximum of 5 people each team.
  • Each game mode will run for a maximum of 5 minutes. This number might change in the future, yet this is in place because I want quick games. Similar to Rocket League, which allows people to play short, yet numerous amounts of them.

Now that that's done, here are the game modes that I have in mind for the game:

Capture.PNG

Deathmatch

Your traditional team deathmatch where 2 teams battle it out to the death. After 5 minutes, the team with the most combined kills wins the game.

Capture.PNG

King of the Hill

2 teams fight to claim ownership of the center piece. When a team's ownership reaches 100%, they win. Ownership can be increased by having a majority of your team's players on the pad. There is also a 5 minute timer, which at the end, if no team is at 100% ownership, then the team with the most wins.

Capture.PNG

Free For All (not sure...)

At the moment a free for all game mode is iffy in my mind. I would like to add it, yet I don't believe that it will fit in with the style of game. For example, playing as a support character like the Cleric would be very weak in this gamemode.

That's all so far. In the next update, I will focus more on what has been done on the game, rather than ideas for the future. If you have any suggestions or questions, ask away. 

Kings of the Arena - Dev Blog #1

For the next 3 weeks i'll be on uni holidays and have decided to create a game that i've had in my mind for quite some time. It's a 2D, top down, multiplayer arena shooter game. A lot to take in, but I can't really explain it in just one sentence. I've had the idea actually for this type of game for around 2 years. In January of 2015 I actually even attempted to make it. It worked, kinda. The multiplayer was a bit finiky, but the overall attacking and killing other players worked out fine.

Kings of the Arena, January 2015. Unfinished, and badly made game.

Kings of the Arena, January 2015. Unfinished, and badly made game.

That's what it looked like. You controlled one of 3 different characters and could shoot projectiles to kill enemies. Each character also had a unique ability, like an arrow burst, invisible or shield. It was kind of similar to a MOBA, where there are the unique heroes with their different stats and abilities. 

At the time of making it, there was no real goal. There was no game modes, no kills required to win - it was an incomplete project.

For the past 2 weeks though, i've been planning a "remake" which will be similar to the original game, yet more carefully designed and complex. The game will be like this...


Kings of the Arena will be a top down 2D, MOBA style shooting game. 

  • There will be a range of characters, with each having their own projectile and 2 unique abilities.
  • The primary source of attacking other players is by shooting a character specific projectile. These projectiles can be dodged by players. 
  • All projectiles deal only damage.
  • There will be a number of different game modes: Deathmatch, King of the Hill and maybe more.
  • The maps will be sized appropriately so that encounters happen regularly.
  • Games will last around 5 minutes.
  • The game will be fast paced. Players will be constantly moving to attempt to avoid enemy projectiles and engaging in combat.
  • Abilities can be projectiles, shields, spawnable followers, auras, for allies, etc. Very similar to those that can be found in DOTA or other MOBAs.
  • Abilities have a cooldown after they are used.

Already in the planning stage i've set out 5 different characters. The Archer, Mage, Cleric, Druid and Assassin. Their design, stats and abilities aren't final, but here they are:

Capture.PNG

Archer is aggressive and will shoot arrows. First ability shoots a poison arrow, second ability puts Archer into a fury mode, temporarily giving extra attack speed.

d.PNG

Mage is defensive and will shot fire balls. First ability shoots an ice shard which stuns target, second ability shields Mage temporarily, blocking 50% of incoming damage.

Capture.PNG

Cleric is support and will shoot wooden spikes. Cleric is special, since they have a secondary attack that shoots small health balls which can heal allies. First ability is a mass heal which heals all allies for a bit, second ability is a syringe projectile which draws health from target overtime and gives it to the Cleric.

Capture.PNG

Druid is a support/aggressive and will shoot rocks. First ability spawns a small creature which follows Druid and shoots at enemies, second ability makes Druid temporarily shoot higher damage but slower rocks.

Capture.PNG

Assassin is aggressive and will shoot daggers. First ability is blink which allows him to teleport a short distance, second ability shoots a high damage dagger.

I've mentioned this game being similar to a DOTA style MOBA, yet really its most comparable game would probably be Overwatch. The different characters have their own playstyles and abilities and there are a range of different game modes for quick play. That is what I want from this game. Quick, in and out play, with games being around 5 minutes long. It should be a game that anyone can pick up and play for as long as they want.

The big question now is... will I even finish it. If you have ever looked at my portfolio, you would see that many of the games I attempted to make in the past have not been finished. That can be due to lack of knowledge, pre-planning, scope and overall goal of the project. For this one though, I have all those things. Doing these blogs regularly would also probably motivate me to keep working on the game and who knows what it will be like 3 weeks from now.

So when is the next blog and how often will I be working on this project? Well, i'm hoping to release a blog around 2 times a week, or maybe even 1 - we'll need to wait and see. I'm also hoping to work on this quite regularly as i'm currently on 3 weeks holiday from uni, so that will give me plenty of time. Also i'm pretty bad at explaining ideas and a lot of this will probably be rambling, so if you still don't really know what sort of game this is going to be, just imagine 2D Overwatch for now. See you soon.

Dev Log #10

This dev log will be a review/kind of post mortem for my typing game assignment.

Capture.PNG

Overall, the project went well and I'm happy with the final outcome. The game runs smoothly, yet there are a few problems I have with it that are quite minor yet are still a annoyance.

First, I wish I had used more events in the game. When I first started on the project, I didn't really use that many events. Only really for the letter inputs and that was it. I only started to use more events and add them to existing systems around a week before it was due. In total there are around 4 events that are used throughout the game. I think there would have been more if I made the base of the game revolve around them.

Another problem is one that is code side, yet I cannot find a solution to it. Each area has a certain amount of enemies that need to be killed in order for the player to move onto the next area. For some reason, sometimes when all the enemies of an area have been killed, the kill count is 1 or 2 less than it needs to be and the player wont move. This is probably not a bug and more sloppy code, but looking over it I cannot find a solution. Every time an enemy dies it adds one to the currentEnemiesKilled variable and every frame the game checks that to see if all the enemies have been killed. This is one of those problems that if it does occur, it messes up the whole game and requires either a restart or a manual setting of that variable to trigger the player movement onto the next area.

This of course could have been avoided if I planned the system ahead of time. Because what I do most of the time is just jump into coding and make it up as I go. In this case though, planning how the system would word would have been a big help.

One thing that I haven't done before that I did do for this project, is pooling particle effects. Since every time an enemy gets hit and killed there's a particle effect, pooling them would make the game run faster and overall be more efficient.

The way it works, is that at the start of the game, it instantiates a set number of game objects for each particle effect. Let's say 10 for example. These 10 of each particle effect then go in lists and can be called upon when needed. So when an enemy gets hit, it looks for a disabled hit particle effect, sets its position and disables it after a certain amount of time. Doing this type of system is good practice for when I perhaps go onto making a larger game and instantiating every time something needs to be done would be too laggy.